Add this feed to your friends list for news aggregation, or view this feed's syndication information.
LJ.Rossia.org makes no claim to the content supplied through this journal account. Articles are retrieved via a public feed supplied by the site for this purpose.
| Wednesday, June 17th, 2026 | ||||||||||||||||||||||||||
| LJ.Rossia.org makes no claim to the content supplied through this journal account. Articles are retrieved via a public feed supplied by the site for this purpose. | ||||||||||||||||||||||||||
| 2:24 pm | Security advisory: CVE-2026-9740 and CVE-2026-11933 in Percona Server for MongoDB TL;DR: This advisory covers the two most important high-severity memory-safety vulnerabilities affecting MongoDB Community and our downstream Percona Server for MongoDB – CVE-2026-11933 and CVE-2026-9740. Both will be addressed in a single coordinated patch release, bundled with other recently revealed lower-scored CVE fixes: CVE-2026-9753, CVE-2026-9752, CVE-2026-9751, CVE-2026-9750, CVE-2026-9749, CVE-2026-9748, CVE-2026-9747, CVE-2026-9746, CVE-2026-9743, and CVE-2026-9741. Fixes land in Percona Server for MongoDB patch window starting next week. The first high-vulnerability issue has nothing between it and your | |||||||||||||||||||||||||
| Tuesday, June 16th, 2026 | ||||||||||||||||||||||||||
| LJ.Rossia.org makes no claim to the content supplied through this journal account. Articles are retrieved via a public feed supplied by the site for this purpose. | ||||||||||||||||||||||||||
| 11:31 am | Extending pt-archiver with a Partition-Aware Plug-in for Fast Retention Policy Enforcement Managing data retention policies is one of the most common operational tasks in MySQL. Applications continuously generate transactional, audit, logging, telemetry, and event data. Over time, these tables can grow to billions of rows, causing:
To address these problems, organizations typically implement retention policies based on dates or timestamps. Examples include deleting events older than 90 days or purging session data older than 30 days and so forth. The deleted data can then eventually be archived somewhere else, like in another DBMS or on external files. One of the most widely used tools for implementing these policies in MySQL ecosystems is pt-archiver, part of the Percona Toolkit. This article provides a review of what pt-archiver is and how to use it, but in particular it focuses on the fact this tool is not partitioning aware, and this can make the deletion phase more costly. The article shows how to extend pt-archiver with a Perl plugin to make it aware of partitioning.
What is pt-archiver?pt-archiver is a command-line utility from Percona Toolkit designed to:
In a few words: implementing retention policies safely. The tool processes rows incrementally in chunks, avoiding massive transactions and reducing impact on production systems. Example: pt-archiver \ --source h=localhost,D=mydb,t=events \ --where "created_at < '2026-05-01'" \ --purge \ --limit 1000 \ --commit-each This command:
pt-archiver provides several advantages compared to ad-hoc DELETE statements. Instead of running: DELETE FROM events WHERE created_at < '2026-05-01'; which may:
pt-archiver processes rows incrementally to make the process overhead less impactful for the database performance. pt-archiver implementation permits flexible archival strategies Rows can be copied to another table on a remote host, exported to files or removed completely More details: ps://docs.percona.com/percona-toolkit/pt-a Example: Copy rows to a remote archive tableThe following example archives rows older than 90 days from a local table into an archive table hosted on a remote MySQL server: pt-archiver \ --source h=localhost,D=sales,t=orders,u=archiver,p=secret \ --dest h=archive-server,D=archive,t=orders_archive,u=archiver,p=secret \ --where "created_at < '2026-05-01'" \ --limit 1000 \ --commit-each \ --progress 10000 \ --statistics In this example:
–-progress reports progress every 10,000 rows If rows should be removed from the source table after being copied, add –purge Example: Export rows to a fileThe following example exports rows older than one year into a text file: pt-archiver \ --source h=localhost,D=sales,t=orders,u=archiver,p=secret \ --where "created_at < NOW() - INTERVAL 1 YEAR" \ --file '/tmp/orders_archive_%Y-%m-%d.txt' \ --output-format csv \ --limit 1000 \ --commit-each \ --progress 10000 \ --statistics In this example:
Rows can optionally be deleted from the source table by adding –purge This allows pt-archiver to be used both for data retention and for offline archival workflows. The Hidden Cost of DELETE StatementsAlthough pt-archiver is much safer than massive DELETE operations, it still fundamentally relies on DELETE statements. This is a critical point. Even when there are proper indexes, the rows are processed in chunks, and transactions are small; the large-scale DELETE operations remain expensive. Deleting rows is expensive in InnoDB because it involves:
When deleting billions of rows, the overhead becomes enormous. Indexes help for sure, but only partially. Consider: DELETE FROM events WHERE created_at < '2024-01-01'; If created_at is indexed, MySQL can efficiently locate rows. However, locating rows efficiently is only part of the cost. The actual delete operations still require all those things we mentioned above. At considerable scale, this becomes expensive. Why RANGE Partitioning is Superior for Retention PoliciesFor time-based retention policies, partitioning is often dramatically more efficient. In particular, RANGE partitioning is very useful for these cases. Example: CREATE TABLE events (
id BIGINT NOT NULL,
created_at DATETIME NOT NULL,
payload JSON,
PRIMARY KEY(id, created_at)
)
PARTITION BY RANGE (TO_DAYS(created_at)) (
PARTITION p202604 VALUES LESS THAN (TO_DAYS('2026-05-01')),
PARTITION p202605 VALUES LESS THAN (TO_DAYS('2026-06-01')),
PARTITION p202606 VALUES LESS THAN (TO_DAYS('2026-07-01'))
);With partitioning, dropping old data becomes: ALTER TABLE events DROP PARTITION p202604; This operation is dramatically faster than running a DELETE. Dropping a partition:
This can remove millions or billions of rows in a matter of seconds without the same large cost of DELETE. The Problem: pt-archiver is Not Partition-AwareUnfortunately, pt-archiver does not automatically understand partitioning strategies. Even if the table is partitioned or the retention policy perfectly matches partition boundaries, pt-archiver still executes DELETE statements. Example: pt-archiver \ --where "created_at < NOW() - INTERVAL 90 DAY" \ --purge Internally, this still produces DELETE … instead of ALTER TABLE … DROP PARTITION … This means organizations may lose the major operational benefits of partitioning, or they need to implement custom scripts for managing the selection of rows to copy using pt-archiver and then use DROP PARTITION separately from the tool. That is doable, and to be honest, not too complicated, but why not make pt-archiver aware of partitioning for some specific use cases? Extending pt-archiver with Pulg-insFortunately, pt-archiver supports Perl plug-ins. A plug-in can do plenty of things. Like: inspect runtime conditions, interact with MySQL, override behaviors, and execute custom logic This gives us an opportunity to implement partition-aware retention handling. The plug-in can:
This approach combines the scheduling/orchestration power of pt-archiver with the efficiency of partition pruning. Plug-in DesignOur plug-in will:
Assumptions:
Full Perl Plug-in for pt-archiverpackage pt_archiver_partition_drop;
use strict;
use warnings;
sub new {
my ($class, %args) = @_;
my $self = {
dbh => $args{dbh},
db => $args{db},
tbl => $args{tbl},
statistics => {},
};
bless $self, $class;
return $self;
}
sub statistics {
my ($self) = @_;
return $self->{statistics};
}
sub before_begin {
my ($self) = @_;
my $dbh = $self->{dbh} or die "Missing dbh from pt-archiver\n";
my $db = $self->{db} or die "Missing db from pt-archiver plugin args\n";
my $tbl = $self->{tbl} or die "Missing tbl from pt-archiver plugin args\n";
my $where = _get_cmdline_option('where');
my $dryrun = $ENV{PT_PARTITION_DROP_DRY_RUN} ? 1 : 0;
die "Missing --where from original command line\n" unless $where;
print "PLUGIN before_begin called\n";
print "DB=$db TABLE=$tbl\n";
print "WHERE=$where\n";
print "PLUGIN_DRY_RUN=$dryrun\n";
my ($column, $cutoff_date) = _parse_where($where);
my $partitions = _get_partitions($dbh, $db, $tbl);
if (!@$partitions) {
print "Table `$db`.`$tbl` is not partitioned. Refusing DELETE.\n";
exit(0);
}
my $partition_expr = $partitions->[0]->{expression};
die "Missing PARTITION_EXPRESSION\n"
unless defined $partition_expr && length $partition_expr;
print "Partition expression: $partition_expr\n";
my $cutoff_value = _evaluate_cutoff(
$dbh,
$partition_expr,
$column,
$cutoff_date,
);
print "Cutoff date: $cutoff_date\n";
print "Cutoff boundary value: $cutoff_value\n";
my $matched;
for my $p (@$partitions) {
next if !defined $p->{description};
next if uc($p->{description}) eq 'MAXVALUE';
if ($p->{description} == $cutoff_value) {
$matched = $p;
last;
}
}
if (!$matched) {
print "No exact partition boundary matches cutoff $cutoff_value. Refusing DELETE.\n";
exit(0);
}
print "Matched boundary partition: $matched->{name}, position $matched->{position}\n";
my @drop;
for my $p (@$partitions) {
next if !defined $p->{description};
next if uc($p->{description}) eq 'MAXVALUE';
if ($p->{position} <= $matched->{position}) {
push @drop, $p->{name};
print "Eligible for DROP: $p->{name}, boundary $p->{description}\n";
}
}
if (!@drop) {
print "No partitions eligible for DROP. Refusing DELETE.\n";
exit(0);
}
my $sql = sprintf(
"ALTER TABLE %s.%s DROP PARTITION %s",
_quote_ident($db),
_quote_ident($tbl),
join(", ", map { _quote_ident($_) } @drop),
);
print "SQL: $sql\n";
if ($dryrun) {
print "PT_PARTITION_DROP_DRY_RUN enabled. Not executing DROP PARTITION.\n";
}
else {
$dbh->do($sql);
print "Dropped partitions: " . join(", ", @drop) . "\n";
}
$self->{statistics}->{partitions_dropped} = scalar @drop;
exit(0);
}
sub _parse_where {
my ($where) = @_;
$where =~ s/^\s+|\s+$//g;
die "Only WHERE format supported: created_at < 'YYYY-MM-DD'\n"
unless $where =~ /^`?([A-Za-z0-9_]+)`?\s*<\s*'(\d{4}-\d{2}-\d{2})'\s*$/;
return ($1, $2);
}
sub _evaluate_cutoff {
my ($dbh, $partition_expr, $column, $cutoff_date) = @_;
my $expr = $partition_expr;
$expr =~ s/`//g;
die "Partition expression does not reference column `$column`: $partition_expr\n"
unless $expr =~ /\b\Q$column\E\b/i;
$expr =~ s/\b\Q$column\E\b/'$cutoff_date'/ig;
die "Unsafe generated expression: $expr\n"
unless $expr =~ /^[A-Za-z0-9_\s\(\)\+\-\*\/,\.'":]+$/;
my $sql = "SELECT $expr";
print "Boundary evaluation SQL: $sql\n";
my ($value) = $dbh->selectrow_array($sql);
die "Cannot evaluate cutoff expression: $sql\n"
unless defined $value;
return $value;
}
sub _get_partitions {
my ($dbh, $db, $tbl) = @_;
my $sql = q{
SELECT
PARTITION_NAME,
PARTITION_DESCRIPTION,
PARTITION_EXPRESSION,
PARTITION_ORDINAL_POSITION
FROM INFORMATION_SCHEMA.PARTITIONS
WHERE TABLE_SCHEMA = ?
AND TABLE_NAME = ?
AND PARTITION_NAME IS NOT NULL
ORDER BY PARTITION_ORDINAL_POSITION
};
my $sth = $dbh->prepare($sql);
$sth->execute($db, $tbl);
my @partitions;
while (my $row = $sth->fetchrow_hashref()) {
push @partitions, {
name => $row->{PARTITION_NAME},
description => $row->{PARTITION_DESCRIPTION},
expression => $row->{PARTITION_EXPRESSION},
position => $row->{PARTITION_ORDINAL_POSITION},
};
}
return \@partitions;
}
sub _get_cmdline_option {
my ($name) = @_;
my $opt = "--$name";
for (my $i = 0; $i < @ARGV; $i++) {
if ($ARGV[$i] eq $opt && defined $ARGV[$i + 1]) {
return $ARGV[$i + 1];
}
if ($ARGV[$i] =~ /^\Q$opt\E=(.*)$/) {
return $1;
}
}
if (open my $fh, '<', "/proc/$$/cmdline") {
local $/;
my $raw = <$fh>;
close $fh;
my @cmd = split /\0/, $raw;
for (my $i = 0; $i < @cmd; $i++) {
if ($cmd[$i] eq $opt && defined $cmd[$i + 1]) {
return $cmd[$i + 1];
}
if ($cmd[$i] =~ /^\Q$opt\E=(.*)$/) {
return $1;
}
}
}
return undef;
}
sub _quote_ident {
my ($ident) = @_;
die "Invalid identifier: $ident\n"
unless defined $ident && $ident =~ /^[A-Za-z0-9_]+$/;
return "`$ident`";
}
1;Create the file named pt_archiver_partition_drop.pm into the /usr/local/share/perl5 path. Also set the environment variable PERL5LIB to let pt-archiver where to find the Perl package export PERL5LIB=/usr/local/share/perl5 Example UsageFirst, create the partitioned table events and insert some fake data. DROP TABLE IF EXISTS events;
CREATE TABLE events (
id BIGINT NOT NULL,
created_at DATETIME NOT NULL,
payload JSON DEFAULT NULL,
PRIMARY KEY (id, created_at)
)
PARTITION BY RANGE (TO_DAYS(created_at)) (
PARTITION p202604 VALUES LESS THAN (TO_DAYS('2026-05-01')),
PARTITION p202605 VALUES LESS THAN (TO_DAYS('2026-06-01')),
PARTITION p202606 VALUES LESS THAN (TO_DAYS('2026-07-01')),
PARTITION pmax VALUES LESS THAN MAXVALUE
);
INSERT INTO events (id, created_at, payload) VALUES
-- p202604
(1, '2026-04-01 08:00:00', JSON_OBJECT('event', 'login', 'user', 'alice')),
(2, '2026-04-03 09:15:00', JSON_OBJECT('event', 'view', 'page', 'home')),
(3, '2026-04-05 10:30:00', JSON_OBJECT('event', 'click', 'button', 'signup')),
(4, '2026-04-08 11:45:00', JSON_OBJECT('event', 'search', 'term', 'mysql')),
(5, '2026-04-10 12:00:00', JSON_OBJECT('event', 'purchase', 'amount', 100)),
(6, '2026-04-14 13:20:00', JSON_OBJECT('event', 'logout', 'user', 'alice')),
(7, '2026-04-18 14:35:00', JSON_OBJECT('event', 'download', 'file', 'report.pdf')),
(8, '2026-04-22 15:50:00', JSON_OBJECT('event', 'upload', 'file', 'image.png')),
(9, '2026-04-26 16:05:00', JSON_OBJECT('event', 'click', 'button', 'buy')),
(10, '2026-04-30 23:59:59', JSON_OBJECT('event', 'month_end')),
-- p202605
(11, '2026-05-01 00:00:00', JSON_OBJECT('event', 'login', 'user', 'bob')),
(12, '2026-05-03 08:10:00', JSON_OBJECT('event', 'view', 'page', 'pricing')),
(13, '2026-05-06 09:20:00', JSON_OBJECT('event', 'search', 'term', 'percona')),
(14, '2026-05-09 10:30:00', JSON_OBJECT('event', 'purchase', 'amount', 250)),
(15, '2026-05-12 11:40:00', JSON_OBJECT('event', 'logout', 'user', 'bob')),
(16, '2026-05-16 12:50:00', JSON_OBJECT('event', 'download', 'file', 'backup.sql')),
(17, '2026-05-20 13:00:00', JSON_OBJECT('event', 'upload', 'file', 'data.csv')),
(18, '2026-05-24 14:10:00', JSON_OBJECT('event', 'click', 'button', 'subscribe')),
(19, '2026-05-28 15:20:00', JSON_OBJECT('event', 'view', 'page', 'docs')),
(20, '2026-05-31 23:59:59', JSON_OBJECT('event', 'month_end')),
-- p202606
(21, '2026-06-01 00:00:00', JSON_OBJECT('event', 'login', 'user', 'carol')),
(22, '2026-06-03 08:05:00', JSON_OBJECT('event', 'search', 'term', 'partitioning')),
(23, '2026-06-06 09:15:00', JSON_OBJECT('event', 'view', 'page', 'dashboard')),
(24, '2026-06-09 10:25:00', JSON_OBJECT('event', 'purchase', 'amount', 500)),
(25, '2026-06-12 11:35:00', JSON_OBJECT('event', 'logout', 'user', 'carol')),
(26, '2026-06-16 12:45:00', JSON_OBJECT('event', 'login', 'user', 'dave')),
(27, '2026-06-20 13:55:00', JSON_OBJECT('event', 'download', 'file', 'archive.zip')),
(28, '2026-06-24 14:05:00', JSON_OBJECT('event', 'upload', 'file', 'video.mp4')),
(29, '2026-06-28 15:15:00', JSON_OBJECT('event', 'click', 'button', 'checkout')),
(30, '2026-06-30 23:59:59', JSON_OBJECT('event', 'month_end')),
-- pmax
(31, '2026-07-01 00:00:00', JSON_OBJECT('event', 'login', 'user', 'eve')),
(32, '2026-07-05 08:30:00', JSON_OBJECT('event', 'view', 'page', 'future')),
(33, '2026-07-10 09:45:00', JSON_OBJECT('event', 'search', 'term', 'maxvalue')),
(34, '2026-08-01 10:00:00', JSON_OBJECT('event', 'purchase', 'amount', 750)),
(35, '2026-09-01 11:15:00', JSON_OBJECT('event', 'retained_future'));
Now you can run the following command to delete all rows before the 1st of May, which, by the way, matches the entire first partition in the table. pt-archiver \ --source h=localhost,D=mydb,t=events,m=pt_archiver_partition_drop \ --where "created_at < '2026-05-01'" \ --purge
Notice the Perl plugin must be indicated with the m option in the DSN string. In practice:
Here is what you get from the execution of the above command: PLUGIN before_begin called
DB=mydb TABLE=events
WHERE=created_at < '2026-05-01'
PLUGIN_DRY_RUN=0
Partition expression: to_days(`created_at`)
Boundary evaluation SQL: SELECT to_days('2026-05-01')
Cutoff date: 2026-05-01
Cutoff boundary value: 740102
Matched boundary partition: p202604, position 1
Eligible for DROP: p202604, boundary 740102
SQL: ALTER TABLE `mydb`.`events` DROP PARTITION `p202604`
Dropped partitions: p202604You can simply verify the table has been managed correctly: SELECT * FROM mydb.events; SHOW CREATE TABLE mydb.events;
Now TRUNCATE the table and recreate the data and try now to specify the where conditions that match a RANGE that is not the first in the list of the boundaries. pt-archiver \ --source h=localhost,D=mydb,t=events,m=pt_archiver_partition_drop \ --where "created_at < '2026-06-01'" \ --purge You should get: PLUGIN before_begin called
DB=mydb TABLE=events
WHERE=created_at < '2026-06-01'
PLUGIN_DRY_RUN=0
Partition expression: to_days(`created_at`)
Boundary evaluation SQL: SELECT to_days('2026-06-01')
Cutoff date: 2026-06-01
Cutoff boundary value: 740133
Matched boundary partition: p202605, position 2
Eligible for DROP: p202604, boundary 740102
Eligible for DROP: p202605, boundary 740133
SQL: ALTER TABLE `mydb`.`events` DROP PARTITION `p202604`, `p202605`
Dropped partitions: p202604, p202605In this case, two partitions have been identified and dropped.
Truncate the table and recreate the data again. Try now to provide a WHERE condition that does not match any of the boundaries in the RANGE. pt-archiver \ --source h=localhost,D=mydb,t=events,m=pt_archiver_partition_drop \ --where "created_at < '2026-04-25'" \ --purge
You get the following: PLUGIN before_begin called
DB=mydb TABLE=events
WHERE=created_at < '2026-04-25'
PLUGIN_DRY_RUN=0
Partition expression: to_days(`created_at`)
Boundary evaluation SQL: SELECT to_days('2026-04-25')
Cutoff date: 2026-04-25
Cutoff boundary value: 740096
No exact partition boundary matches cutoff 740096. Refusing DELETE.As expected, the tool now refuses to execute anything if it doesn’t find an exact match.
Operational BenefitsThis approach provides major advantages. Dropping partitions is vastly faster than deleting rows, and minimal binary logging is needed, compared to billions of row deletes. There is no massive transactional overhead for managing undo logs and purging. You get then a better InnoDB Buffer Pool stability because of less page churn. In the end, retention jobs are completed quickly and consistently in a predictable way and at the minimal cost.
Important CaveatsPartition Boundaries Must Match Retention PolicyIf partitions contain mixed retention windows, DROP PARTITION may remove too much data. For this reason, ensure correct partition design. Recommended:
aligned with business retention requirements. Metadata LocksALTER TABLE DROP PARTITION still acquires metadata locks. Test carefully in production. Backup AwarenessEnsure dropped partitions are no longer needed before removal or use pt-archiver to also copy the data into a remote server or dump the data into a CSV file before running the DROP PARTITION.
Possible EnhancementsThe plug-in can be extended further. Potential improvements:
These are just some ideas I had meanwhile doing my tests. What you can do by implementing a Perl plugin is only limited by your imagination and your real needs. Conclusionpt-archiver remains an excellent tool for implementing retention policies and archival workflows. However, DELETE-based purging becomes increasingly expensive at scale, even with proper indexing and chunked processing. For large time-series or historical datasets, RANGE partitioning is often a dramatically superior strategy. The challenge is that pt-archiver does not natively leverage partition-level operations. Fortunately, its Perl plug-in architecture allows advanced users to extend its behavior and implement partition-aware cleanup logic. By combining:
Organizations can achieve:
For large MySQL deployments, this hybrid approach can turn multi-hour purge operations into near-instant metadata operations. The use case presented in this article is limited to a specific scenario, but you can reuse it or customize it if you have a different kind of RANGE partitioning, for example, not using TO_DAYS(). Take this as just an example of how you can extend pt-archiver. What you can do for real is driven by your needs and/or only limited by your imagination. More info about extending pt-archiver:
The post Extending pt-archiver with a Partition-Aware Plug-in for Fast Retention Policy Enforcement appeared first on Percona. | |||||||||||||||||||||||||
| Monday, June 15th, 2026 | ||||||||||||||||||||||||||
| LJ.Rossia.org makes no claim to the content supplied through this journal account. Articles are retrieved via a public feed supplied by the site for this purpose. | ||||||||||||||||||||||||||
| 6:58 am | Group Replication VS Percona XtraDB Cluster: The True Cost of Consistency OverviewWhen building high-availability MySQL environments, the choice between MySQL Group Replication (GR) and Percona XtraDB Cluster (PXC) often comes down to how they handle the eternal database dilemma: data consistency versus performance. While both provide “synchronous-like” replication, they approach the problem of stale reads—reading data that has been committed on one node but not yet applied on another—in distinct ways. Understanding these differences, and the performance penalties associated with fixing them, is critical for any production environment. Technology OverviewsMySQL Group Replication (GR) Group Replication is the native, albeit more recent, high-availability solution built by Oracle for MySQL. It is based on a distributed state machine architecture and uses the Paxos consensus protocol.
Percona XtraDB Cluster (PXC) PXC is an open-source enterprise solution based on Percona Server for MySQL and the Galera Replication library, which is the first and most mature virtually synchronous solution for MySQL.
The Battle Against “Stale Reads”: Why It MattersThe most critical distinction for developers is whether a SELECT query on Node B will immediately see the INSERT just performed on Node A. In a distributed system, there is a microsecond-to-millisecond gap between a transaction being globally ordered (everyone knows it happened) and being locally applied (the data is physically readable in the table). Reading executed on a secondary during this gap results in a stale read. Why is avoiding stale reads so critical?While a stale read might just mean a user temporarily sees their old profile picture after updating it, in many business cases, it breaks the application’s core logic:
To prevent these scenarios, we must tell the database to enforce strict consistency. But how do GR and PXC handle this, and what does it cost? Consistency Controls ComparisonBoth Group Replication and Percona XtraDB Cluster provide built-in mechanisms to enforce consistency and eliminate stale reads when your application demands it. However, they approach this problem using entirely different variables and distinct levels of granularity. The table below breaks down the specific controls each technology offers, highlighting exactly what it takes to force a node to serve fresh data.
The True Cost of Being ConsistentIf we know stale reads are bad, why don’t we just enforce strict consistency everywhere? An image can help to understand:
Because in distributed databases, consistency is incredibly expensive. To test this, we used a 3-node internal lab environment to run a Sysbench-based TPC-C derivative test (50/50 read/write split, running for 600 seconds, scaling from 1 to 1024 threads). You can find the detailed machine specifications here. The benchmarks were executed using a TPC-C derivative test based on sysbench. Finally—and crucially—you can review the configuration files used for the tests. I maintained the same baseline MySQL configuration across the board, only adjusting the parameters specific to each replication technology.
Scenario 1: Default (Relaxed) Consistency(GR = EVENTUAL, PXC = wsrep-sync-wait 0) I want to remind, that MySQL CE and Percona Server are running using Group Replication, while PXC is using galera. With default settings, both systems allow stale reads.
Both technologies scales well up to 128 threads:
At this level, the lag between the moment of commit and the moment the server returns the answer is minimal. But we are entirely exposed to stale reads. Scenario 2: Enforced Consistency (The Cost)(GR = AFTER, PXC = wsrep-sync-wait 7) When we configure the servers to prevent stale reads, the systems must wait for transactions to be fully applied before returning a read. This is where the architectural differences become glaringly apparent:
This is the crucial takeawayEnforcing strict consistency in Group Replication results in a massive ~75% performance penalty. The latency between the commit and the server response increases significantly compared to PXC. The intermediate wayThere is another approach which is to inject the higher consistency only when it is really needed. The Solution: Session-Level Consistency You do not need, and should not use, full consistency at the global level for general cases. Instead, force consistency only when and where it is critical. While for Group Replication there is no support for SQL injection hints like SELECT /*+ SET_VAR(…) */, you can enforce this at the session level right before a critical read: SET SESSION group_replication_consistency = 'AFTER'; -- OR for PXC: SET SESSION wsrep_sync_wait = 7;
To note that PXC offers more flexibility and you can use hints: select /*+ SET_VAR(wsrep_sync_wait=7) */ @@session.wsrep_sync_wait ,@@global.wsrep_sync_wait; +---------------------------+--------------------------+ | @@session.wsrep_sync_wait | @@global.wsrep_sync_wait | +---------------------------+--------------------------+ | 7 | 0 | +---------------------------+--------------------------+
By isolating these variables to specific sessions (like the immediate redirect after a password change or a checkout process), you ensure data integrity exactly where the business requires it, while allowing the rest of your application to enjoy the high-speed performance of relaxed consistency.
PXC: The performance drop is minimal and the solution is able to provide a consistent delivery with nice scalability up to 256 threads. Group Replication: The solution suffers from a significant drop, not as if we set the AFTER condition at global level, but still we see a drop of ~52%. Comparing the two solutions we can see that PXC is able to deal with the additional requested consistency better.
Additional differencesBut these are not the only differences we can immediately see.
Yes, for exactly the same load and traffic Group Replication consumes 8GB more than PXC, which in this environment represents 26% memory more, over total available.
Cost that is reflected also as CPU utilization.
Conclusion: How to Survive the CostHow impactful is enforcing strict consistency at a global level in a production environment? Massively. If you blindly enforce strict consistency globally without understanding your architecture, you will decimate your database throughput. Here is the reality of how the two solutions handle that tax:
The Final Verdict Modifying consistency values at the global server level should only be done after rigorous load testing and a complete understanding of the performance tax you are about to pay. Ultimately, it comes down to choosing the right tool for your specific SLA:
Referenceshttps://docs.percona.com/percona-xtradb-c The post Group Replication VS Percona XtraDB Cluster: The True Cost of Consistency appeared first on Percona. | |||||||||||||||||||||||||
| LJ.Rossia.org makes no claim to the content supplied through this journal account. Articles are retrieved via a public feed supplied by the site for this purpose. | ||||||||||||||||||||||||||
| 6:57 am | The Failover Brownout: Rethinking High Availability in MySQL Group Replication It is time to talk again about Flow control and group replication. This time with a special eye on the use of Group Replication in the Kubernetes context. In this article we will dig a bit on how it works and what are the various side effects.
The problemRecently I was refining the calculation I use in the MySQL calculator for Operator given I was constantly encountering a very serious problem with the Percona Server Operator. The problem is that when the deployment was/is serving a high level of traffic, it will, no matter what, end up in getting OMMKill by the K8 system. This because the pod was gradually consuming more and more memory, reaching the memory limit set in the CR specification.
Now let me clarify a few things, to get straight to the facts. Kubernetes itself does not OOMKill a pod for hitting its memory limit, the mechanism works as described below with mention on how Working Set Size (WSS) is calculated, and how OOMKills are triggered, and in the resource sections, the links to the official documentation and source code.
1. The Reality of OOMKills vs. Kubelet EvictionsIt is crucial to distinguish between what the Linux kernel does and what Kubernetes does:
2. How Working Set Size (WSS) is Calculated for the containerKubernetes monitors container memory via cAdvisor, which is integrated directly into the kubelet. cAdvisor calculates the Working Set Size by taking the total memory usage and subtracting the inactive file cache (memory that the kernel can easily reclaim if it faces memory pressure). Because active file caches and anonymous memory (like our application’s heap) cannot be easily evicted, this working set metric is the most accurate representation of the memory your container is forcing the system to hold.
The Calculation & cgroups Evolution The core mathematical calculation is Memory Usage – Inactive File Cache, but how cAdvisor fetches this data from the Linux kernel depends entirely on your node’s cgroup version. Modern cAdvisor relies heavily on the opencontainers/runc/libcontainer library to read these raw cgroup files:
The Underlying Code Logic While older versions used a static setMemoryStats function, modern Kubernetes branches handle this dynamically. The logic executes the following flow before reporting back to the kubelet:
Back to usAt the end the point is that if our pod reaches the limit and we ARE NOT using the new swap feature existing in Kubernetes, our pod will be brutally killed, and in 99% of the cases our production will suffer a lot. !Ops spoiler!
To clearly understand what was causing the issue about this memory consumption and having my calculator fail, I started to collect the information about the memory usage in MySQL itself.
SELECT EVENT_NAME,CURRENT_NUMBER_OF_BYTES_USED / 1024 / 1024 AS current_usage_mb FROM performance_schema.memory_summary_global Which will give you and output like this: +---------------------------------------+------------------+ | EVENT_NAME | current_usage_mb | +---------------------------------------+------------------+ | memory/innodb/buf_buf_pool | 46398.92578125 | | memory/group_rpl/GCS_XCom::xcom_cache | 1066.66179943 | | memory/group_rpl/certification_info | 92.45250702 | | memory/innodb/log_buffer_memory | 64.00096130 | | memory/sql/TABLE | 49.90627003 | | memory/innodb/memory | 34.68734741 | | memory/innodb/ut0link_buf | 24.00006104 | | memory/innodb/lock0lock | 21.40064240 | | memory/mysqld_openssl/openssl_malloc | 9.51009655 | | memory/innodb/read0read | 8.19496155 | | memory/mysys/KEY_CACHE | 8.00215149 | | memory/innodb/sync0arr | 7.03147125 | | memory/innodb/ha_innodb | 6.87006950 | | memory/innodb/lock_sys | 5.25009155 | | memory/sql/log_sink_pfs | 5.00003052 | | memory/innodb/ut0pool | 4.00017548 | | memory/sql/dd::objects | 2.83031464 | | memory/innodb/std | 2.72618866 | | memory/innodb/os0file | 2.63054657 | | memory/innodb/os0event | 2.34302521 | | memory/sql/TABLE_SHARE::mem_root | 2.31734467 | | memory/innodb/trx0trx | 2.22647858 | | memory/temptable/physical_ram | 1.00003052 | | memory/sql/dd::String_type | 0.94942093 | | memory/innodb/btr0pcur | 0.89743423 | +---------------------------------------+------------------+
Plus I used PMM to collect memory information
To simulate the load I used the sysbench-tpcc (tpc-c derivate test) variant and run the tests simulating a load of 1024 threads against a cluster based on machine with 16 Core and 64Gb volumes ~3k IOPS, so not gigantic but not small.
The finding was almost immediate: +---------------------------------------+------------------+ | EVENT_NAME | current_usage_mb | +---------------------------------------+------------------+ | memory/innodb/buf_buf_pool | 46398.92578125 | | memory/group_rpl/certification_info | 1431.67934418 | <constantly increasing | memory/group_rpl/GCS_XCom::xcom_cache | 1066.63542366 | | memory/sql/Gtid_set::Interval_chunk | 95.52413940 | | memory/innodb/log_buffer_memory | 64.00096130 | | memory/sql/TABLE | 48.17613125 | | memory/innodb/memory | 35.08897400 | | memory/innodb/ut0link_buf | 24.00006104 | | memory/innodb/lock0lock | 21.40064240 | | memory/innodb/read0read | 14.86782837 | | memory/mysqld_openssl/openssl_malloc | 12.05916119 | | memory/mysys/KEY_CACHE | 8.00215149 | | memory/innodb/sync0arr | 7.03147125 | | memory/innodb/ha_innodb | 6.84074974 | | memory/innodb/lock_sys | 5.25009155 | | memory/sql/log_sink_pfs | 5.00003052 | | memory/innodb/ut0pool | 4.00017548 | | memory/sql/dd::objects | 2.82012177 | | memory/innodb/std | 2.72515869 | | memory/innodb/os0file | 2.63054657 | | memory/innodb/os0event | 2.35884857 | | memory/innodb/trx0trx | 2.22647858 | | memory/sql/TABLE_SHARE::mem_root | 1.83777618 | | memory/innodb/trx0undo | 1.26304626 | | memory/mysys/lf_node | 1.08828735 | +---------------------------------------+------------------+
What is group_rpl/certification_info?In MySQL, memory/group_rpl/certification_info is a Performance Schema memory instrument. It tracks the exact amount of RAM allocated to store the Certification Database (or Certification Info). In Group Replication, nodes do not lock rows across the network while a transaction is executing. Instead, transactions execute locally and optimistically. When it is time to commit, the transaction undergoes a Certification Process to ensure no other concurrent transaction in the cluster has modified the exact same rows. The certification_info buffer is the in-memory hash map that makes this conflict detection possible. 1. What is it used for?The certification_info structure acts as a tracking ledger for recently modified rows. Here is how it works under the hood:
The primary does not hold onto this memory out of stubbornness; it does so because purging that data too early would destroy the cluster’s consistency in the event of a failover.
In Group Replication, garbage collection for the certification_info buffer is not triggered just because a transaction commits on the primary. It is triggered by a concept called the Stable Set. Every node in the cluster periodically broadcasts a message to the rest of the group saying, “Here are the GTIDs I have successfully applied to my disk.” The cluster then calculates a global low watermark. This watermark is the highest transaction GTID that every single member of the group has successfully applied. Garbage collection is only allowed to purge write-sets from the certification database that fall below this global watermark. 2. How the Apply Queue Stalls the WatermarkWhen a secondary node starts lagging, its applier queue grows. This means the secondary is receiving transactions from the network quickly, but its SQL thread is too slow to actually execute them and commit them to disk. Because the secondary hasn’t applied these transactions, it cannot report those GTIDs back to the group as “finished.”
3. Why the Primary Cannot Purge Earlywe might wonder: If the transaction is already committed on the primary, why does the primary care if the secondary has applied it? Why not just drop the write-set from its own memory? The answer comes down to Failover Safety and Distributed Conflict Detection. GR is a shared-nothing, decentralized architecture. Even if you are running in Single-Primary mode (keep this in mind will be important later), the underlying engine uses the exact same logic as Multi-Primary mode. Here is why the primary is forbidden from purging that data:
Fine Marco, then what is the effect of this?
Well, drums roll … … When a secondary node is elected as the new primary during a failover, it does not immediately open the floodgates to new writes. It keeps its super_read_only variable set to ON until it has completely drained its local apply queue of all transactions that were certified prior to the election. This is an intentional design choice to guarantee that the new primary’s state is completely consistent with the old primary before it starts accepting new data.
4. Immediate Write Rejections (No Built-in Queuing)The most critical impact to understand is that the new primary does not queue or pause new incoming writes while it catches up. It outright rejects them. If our application or proxy routes a COMMIT, INSERT, UPDATE, or DELETE to the new primary while it is still processing the old queue, MySQL will immediately throw an error back to the client: ERROR 1290 (HY000): The MySQL server is running with the –super-read-only option so it cannot execute this statement 5. The “Brownout” Window (Write Outage)Because of this behavior, a failover in MySQL Group Replication does not instantly restore write availability. Our cluster experiences a “brownout”, a period where reads might succeed, but writes are entirely blocked. The duration of this write outage is directly proportional to the size of the apply queue.
6. Impact on Proxies (e.g., MySQL Router or ProxySQL)If we are using a proxy layer to route your database traffic, the apply queue dictates how the proxy behaves during the transition:
7. Read Traffic and Stale DataDuring this catch-up phase, the node will accept incoming SELECT queries (since it is still a valid database). However, because it is actively churning through the old primary’s backlog, the data being read is temporarily stale. If your application reads a row that is sitting in the apply queue but hasn’t been committed to disk yet, it will get the old version of that row. Why Flow Control is CriticalBecause a large apply queue turns a seamless failover into a severe, application-breaking write outage, Group Replication includes the Flow Control feature. Flow Control monitors the size of the apply queues across all secondaries. If a secondary starts lagging too far behind, Flow Control should actively throttle the write throughput on the current primary to allow the lagging node to catch up. It is essentially a trade-off: we accept a slight performance hit during normal operations to guarantee that your database recovers almost instantly during a failover. However, this is not what really happens. 1. It is Reactive, Not Proactive (The Polling Blind Spot)Flow control does not intercept and evaluate every single transaction in real-time. Instead, it relies on a periodic polling interval governed by group_replication_flow_control_period (which defaults to 1 second). Once a second, the cluster checks the size of the apply queues and the certifier queues.
2. The PID Controller’s “Soft Brake” MathWhen flow control does decide to throttle, it does not simply freeze the primary. It uses a PID (Proportional-Integral-Derivative) controller algorithm to calculate a “write quota” (the maximum number of transactions the primary is allowed to commit in the next second). The PID controller is deliberately tuned to be gentle. It wants to gracefully degrade performance rather than cause immediate application timeouts.
3. The Concurrency Mismatch (Parallel vs. Serial)This is often the silent killer that defeats flow control. Flow control makes mathematical assumptions about how fast the secondary should be able to apply transactions based on recent history. However, the primary node might be executing writes using hundreds of highly concurrent threads. The secondary relies on the parallel applier to keep up. If the incoming workload suddenly includes transactions that cannot be parallelized, such as writes hitting overlapping rows, cascading foreign key updates, or DDL statements, the secondary’s applier instantly drops from executing in parallel down to a single, serialized thread. When this serialization happens, the secondary’s applier rate plummets instantly. Flow control, which only checks in once a second and adjusts gradually, cannot brake the primary fast enough to compensate for the secondary suddenly dropping to a crawl. What can we do?At the moment of writing there are only two things that can be done.
1. Making Flow Control More AggressiveWe can configure Flow Control to be a bit more aggressive. It will still remain a suggestion but a strong one. How it works (The Configuration):
The reality check, does it work?: If the expectation is to have a rigid control over the applier queue on the lagging secondary, then the answer is NO. No matter what, at the moment flow control is not designed to act as we are used to in PXC (Percona Xtradb Cluster), where we have a rigid control of the pending queue also at the cost of delaying the writes. In Group Replication the Flow Control will never bring the write to 0, the unfortunate aspect is that the mechanism is not enough to keep the queue under control.
2. Increasing Replication AppliersTo help the secondary chew through the queue faster, we can increase the number of parallel threads it uses to write to disk. How it works: We can increase the replica_parallel_workers (formerly slave_parallel_workers) setting. GR is exceptionally smart about this. Because of the certification process we discussed earlier, GR already knows exactly which transactions modify which rows. It uses a writeset-based dependency tracker to safely hand off non-conflicting transactions to multiple worker threads simultaneously. The reality check, does it work?: Yes, but only if our workload allows it.
Do we have any conclusions?1. If HA is the goal, enforce Strict Flow ControlIf our absolute top priority is High Availability, specifically achieving a near-zero Recovery Time Objective (RTO), we must configure an aggressive flow control.
The problem is that Group Replication is not able to act like that today, this is something we eventually need to implement to have better HA. 2. If Performance is the goal, relax Flow ControlIf our top priority is keeping the application fast and ensuring COMMIT latencies remain extremely low, we should relax flow control or rely on the generous defaults.
3. Is this not what Asynchronous replication with semy-sync offers?
1. The SimilaritiesIf we look purely at how a single transaction flows and how a failover behaves, GR and Semi-Sync look like twins:
2. The Crucial DifferencesIf they behave so similarly, why use GR at all? Here is what GR gives you that Semi-Sync does not:
3. Final observationIf we are using Single-Primary GR with relaxed flow control, we have essentially built a highly-automated, consensus-driven version of Semi-Sync replication. We have the exact same apply-queue bottleneck during failover, but we have traded the need for external orchestrator tools for built-in Paxos consensus and native split-brain protection.
Conclusions (for real)When we run MySQL on a traditional, dedicated Virtual Machine, memory limits are “soft.” If the certification_info database explodes and consumes an extra 10GB of RAM because of the applier lag, the Linux OS might start aggressively swapping inactive pages to disk, but the MySQL process usually survives. Performance degrades, but the database stays online. In Kubernetes, memory limits are “hard.” As we discussed earlier, Kubernetes enforces pod memory limits via cgroups v2 (memory.max). The Linux kernel’s OOM Killer has no understanding of database quorum, failover states, or apply queues. It only sees math: Working Set Size > memory.max = Terminate Process (Exit Code 137). The Chain Reaction of Relaxed Flow Control in k8sIf we prioritize “performance” by relaxing Flow Control in a Kubernetes environment, we are essentially setting a ticking time bomb. Here is the chain of events:
Because we tried to avoid a few seconds of write latency by keeping relaxed Flow Control, we inadvertently caused a hard crash of the primary database pod, with long write downtime. The Architectural LawTherefore, here is my statement as architectural law for containerized environments: In Kubernetes, High Availability and Pod stability are so intrinsically linked that Flow Control must act as hard as it can to cap the apply queue.
In a Kubernetes environment, we must tune group_replication_flow_control_applier_t NoteJust as a mention this is exactly how Percona Operator with Percona Xtradb Cluster works. To be more specific, PXC and in general solutions based on Galera have a Flow Control mechanism that enforces the queue to be inside hard limits. While this more invasive control may be noticeable at application level, it guarantees that the other nodes are not lagging behind the primary and this is why it is a stronger HA solution in the Kubernetes environment.
Referencehttps://github.com/Tusamarco/mysqloperat Managing Resources and OOMKills: Resource Management for Pods and Containers (This page details how memory limits are enforced reactively by the Linux kernel via OOM kills). How WSS triggers Evictions: Node-pressure Eviction (This page explicitly details how the kubelet uses the memory.available signal, which is derived from node capacity minus the working set size). Latest changes. Pointer to the code Swap Memory Management (Core Concepts & Configuration): https://kubernetes.io/docs/concepts/clus The post The Failover Brownout: Rethinking High Availability in MySQL Group Replication appeared first on Percona. | |||||||||||||||||||||||||
| Tuesday, June 9th, 2026 | ||||||||||||||||||||||||||
| LJ.Rossia.org makes no claim to the content supplied through this journal account. Articles are retrieved via a public feed supplied by the site for this purpose. | ||||||||||||||||||||||||||
| 10:25 am | Percona Operator for MySQL (PXC) 1.20.0: Automatic Storage Resizing, TLS Certificate Rotation, and ARM64 Support
Percona Operator for MySQL PXC 1.20.0 is out today, and it addresses three long-requested operational headaches: storage that grows on its own before it fills up, TLS certificates that rotate without cluster downtime, and images that run natively on ARM64. Disk-full incidents on PXC clusters often arrive at 2 AM when monitoring alerts fire, and someone has to manually expand PVCs before writes grind to a halt. Certificate rotations have traditionally meant a carefully timed series of kubectl edits with real downtime risk. And ARM64 hardware has been increasingly common in dev clusters and cost-optimized cloud node pools, where x86-only images created extra friction. 1.20.0 addresses all three in a single release. The operator is open source and runs on any CNCF-conformant Kubernetes distribution, including GKE, EKS, AKS, and OpenShift. It supports Kubernetes 1.33 through 1.36 and PXC 8.4, 8.0, and 5.7.
In this post, you’ll learn about:
Automatic Storage Resizing
Why it mattersA full data volume is the most common cause of unplanned maintenance on a PXC cluster. Until now, avoiding it required external monitoring, manual kubectl patch pvc steps, and waiting for the storage class to honor the resize. Even with good alerting, the operator itself had no mechanism to react: it could only expand PVCs when you changed the spec by hand. 1.20.0 introduces built-in storage autoscaling. The operator polls each PVC’s actual disk usage, and when usage crosses a configured threshold, it automatically expands the claim. You set the trigger percentage, the step size per resize event, and an optional upper bound. The operator handles everything else.
How it worksThe autoscaler runs inside the normal reconcile loop. It reads status.capacity.storage from each PXC PVC, compares current usage against triggerThresholdPercent, and issues a PVC resize when the threshold is crossed. It sets a percona.com/pvc-resize-in-progress annotation on the CR while an expansion is active. This annotation blocks concurrent rolling restarts or upgrades from starting, so nothing disrupts the cluster mid-resize. You can also set enableExternalAutoscaling: true if an external tool, such as KEDA, already manages PVC sizes for your cluster. When you enable external autoscaling, the built-in loop skips its resize check entirely to avoid conflicts.
Wiring it upAdd storageScaling to your PerconaXtraDBCluster spec: apiVersion: pxc.percona.com/v1
kind: PerconaXtraDBCluster
metadata:
name: cluster1
spec:
crVersion: 1.20.0
storageScaling:
enableVolumeScaling: true
autoscaling:
enabled: true
triggerThresholdPercent: 80 # resize when a PVC is 80% full
growthStep: 2Gi # add 2Gi per resize event
maxSize: 100Gi # never grow beyond 100Gi per PVC
# enableExternalAutoscaling: falseAny PVC expansion requires enableVolumeScaling: true, whether the autoscaler or a manual spec change triggers it. Setting autoscaling.enabled: true enables the threshold-based path on top of that. Leave the autoscaling block out if you only want to permit manual spec-driven resizes.
CaveatsStorage expansion requires a StorageClass with allowVolumeExpansion: true. Check before enabling: kubectl get storageclass \
-o jsonpath='{range .items[*]}{.metadata.name}{"\t"}{.allowVolumeExpansion}{"\n"}{end}'Autoscaling applies only to PXC data volumes. If your storage class or CSI driver handles expansion externally, use enableExternalAutoscaling: true to prevent the two mechanisms from racing.
Automated TLS Certificate RotationWhy it mattersRotating TLS certificates on a live PXC cluster has always carried risk. The Galera protocol requires all nodes to trust each other’s CA simultaneously. Swap the CA on one node before the others accept it, and inter-node communication breaks. The safe approach requires a three-phase CA swap with rolling restarts between each phase: a process that is easy to get wrong under time pressure. 1.20.0 formalizes this into a first-class operator workflow. Create a Secret named <ssl-secret>-new containing the replacement credentials, and the operator runs the full three-phase rotation automatically, pausing for rolling restarts between each step.
How it worksThe rotation proceeds in three steps that the operator coordinates:
When step 3 completes, the operator automatically deletes the -new Secret. The cluster never loses TLS connectivity between nodes during the process.
Wiring it upGiven a cluster named cluster1 using the default SSL Secret cluster1-ssl, create the replacement: kubectl create secret generic cluster1-ssl-new \ --from-file=ca.crt=new-ca.crt \ --from-file=tls.crt=new-server.crt \ --from-file=tls.key=new-server.key You do not need to change the PerconaXtraDBCluster CR. The operator detects the -new Secret on the next reconcile and starts the rotation. No kubectl patch on the CR, no operator restart.
CaveatsThe operator does not yet surface rotation progress in .status.conditions. Monitor the rotation by watching PXC pods restart in sequence and checking that the -new Secret is eventually gone: kubectl get pods -w -l app.kubernetes.io/component=pxc kubectl get secret cluster1-ssl-new # should 404 when rotation is complete
ARM64 Support
Why it mattersAWS Graviton3, Google Axion, and Azure Cobalt100 instances deliver better price-to-performance on memory-intensive workloads like PXC. Previously, running the operator on ARM64 nodes required cross-architecture scheduling workarounds or explicit node exclusions for operator pods. All PXC operator images now publish native linux/arm64 layers alongside nodeSelector
What is coveredEvery image in the PXC operator stack ships multi-arch manifests in 1.20.0:
This release also fixes a logrotate crash on ARM64 (K8SPXC-1821) that a missing dependency in the ARM64 container layer caused. 1.20.0 ships the fix. Wiring it upYou do not need any configuration change. Pull the 1.20.0 operator image and Kubernetes schedules it on whichever architecture is available. To pin PXC pods explicitly to ARM64 nodes, add a nodeSelector or node affinity in the spec.pxc block: spec:
pxc:
nodeSelector:
kubernetes.io/arch: arm64
Other Improvements
ConclusionPXC Operator 1.20.0 turns three previously manual steps into operator-managed concerns: disk growth, certificate rotation, and ARM64 scheduling. Combined with PITR validation improvements and configurable leader election, this release reduces the operational surface area for clusters running under production pressure. If you run into edge cases with automatic storage resizing or TLS rotation, the community forum is the right place to share them.
Try It Out
The post Percona Operator for MySQL (PXC) 1.20.0: Automatic Storage Resizing, TLS Certificate Rotation, and ARM64 Support appeared first on Percona. | |||||||||||||||||||||||||
| Thursday, June 4th, 2026 | ||||||||||||||||||||||||||
| LJ.Rossia.org makes no claim to the content supplied through this journal account. Articles are retrieved via a public feed supplied by the site for this purpose. | ||||||||||||||||||||||||||
| 11:44 am | Migrating from MongoDB 6.0 to 8.0: How Percona ClusterSync Handles Cross-Version Replication Percona ClusterSync for MongoDB (PCSM) replicates data between MongoDB clusters to keep migrations with near-zero downtime. Prior to version 0.9.0 it required the source and target to run the same major version, which ruled out the lift-and-shift move most migrations want: going from an older major like 6.0 straight onto a newer one like 8.0. When we first pointed PCSM at a target running a newer major version of MongoDB, we quickly discovered a problem. Cross-version replication failed because a change stream was applying only a small fraction of the events it read. Because so much of what we read never made it to the target, we assumed the problem was format. We braced for a layer that would rewrite change stream events between major versions. That assumption was wrong, and being wrong about it is the most interesting part of this story. The problemThe same-major requirement in earlier versions stemmed from a simple assumption: matching majors maintained metadata and API compatibility. The tool never had to reason about a version gap. The catch is that getting both clusters onto the same major version first is exactly the step a low-downtime migration aims to avoid. PCSM already knew the versions it was talking to. On startup, it asked each cluster for its build version and logged the results. It just did nothing with that information. No downgrade guardrail, no compatibility gate, no feature-compatibility-version check. Cross-version replication worked when it worked and broke when it broke, and nothing in the tool had an opinion either way. So we ran a spike to find out what cross-version replication actually needed. Two findings reshaped the whole effort. First, we found that for the operations PCSM cares about, MongoDB 6.0 and 8.0 produce the same change-stream events. There was no format to translate. The layer we expected to build did not need to exist. Second, the cross-version failures were not many separate problems. They were one problem. A DDL operation would fail, the error got swallowed, and PCSM would attempt to continue applying changes to a target whose state had already diverged from the source. That single swallowed error cascaded into failed selective replication, missing indexes, and capped-collection mismatches downstream. The gap between events read and events applied was just the tool reading events it could no longer apply, because the collection state had already drifted. The goal shrank from building a complex translation layer to maintaining better discipline about handling the operations we already understood. The approachWe set out with a longer list of goals than we shipped, and several of them turned out to matter less than we thought going in. Here is what actually landed. The tool now:
Two things we had considered did not ship and were moved to the known limitations list: patch-level version enforcement and fetching the feature compatibility version at startup. More on those below. Stop swallowing DDL errorsThe replication path that applied DDL operations (creating and dropping collections, building indexes, changing collection options) used to ignore errors and keep running. We made those failures surface and stopped the run instead. On its own, that fixes no compatibility logic, yet it took the cross-version suite from about half-failing to clean. The reason is that almost none of those failures were independent. One DDL operation would fail, the error went nowhere, and PCSM kept applying later events against a target that had already drifted from the source. Every subsequent mismatch was counted as a separate failure. Once the first error stopped the run instead of vanishing, what was left was a handful of operations that genuinely behave differently between majors. Surfacing these failures made them findable. Handling those few remaining cases is what got the release as a whole to a clean run. The version guardrailBefore doing anything else, PCSM now reads the build version from both clusters and compares them. A downgrade is a hard stop. A cross-version upgrade logs an informational line and proceeds. This check is the contract PCSM 0.9.0 that is shipping: var ErrDowngrade = errors.New("downgrade not supported")
func CheckVersionCompat(source, target ServerVersion) (bool, error) {
if source.Major() > target.Major() {
return false, errors.Wrapf(ErrDowngrade, "source %s > target %s", source, target)
}
return source.Major() < target.Major(), nil
}The comparison is limited to the major version. Equal majors are treated as the same version, a lower source major as a supported upgrade, and a higher source major as a refused downgrade. That is the whole gate. A capped-collection rounding bugThis was the one genuine cross-version-only bug. It’s a good example of the kind of thing that does not show up until you actually run the mismatch. MongoDB 6.x rounds capped-collection sizes up to the nearest 256 bytes internally. When a capped-size change flows through the change stream, the event carries the size the user asked for, say 3333 bytes, not the size 6.x actually stored, 3584. A newer target stores exactly what it is told, so applying the requested size produces a collection that does not match the source. The fix rounds the size up to the nearest 256-byte boundary when the source is 6.x. It showed up in just three of the suite’s two hundred tests, all in the capped-size checks. That was the entire substance of what we had feared would be a sprawling 6.0-to-8.0 compatibility effort. Tolerating transient catch-up errorsWhile PCSM is still catching up to the source, some operations arrive referencing objects that do not exist yet or are already on their way out. Missing namespaces, missing indexes, invalid options, and mid-drop databases are all treated as non-fatal during this window, because the final state converges regardless. The TTL-index case is the one where the version difference actually shows its face. PCSM clones a TTL index with its expiry set so far in the future that the target will not start deleting documents while the initial sync is still running, then restores the real expiry once the sync is done. A 7.0 target had no problems when restoring the real expiry. The 8.0 target we tested rejected that operation as an index-options conflict. Same replayed sequence, same options, accepted by one major and refused by the next. PCSM handles it structurally: when the restore is refused, it drops the index and recreates it from the specification it already has. That happens once per affected TTL index, at the end of the sync.
The resultPCSM 0.9.0 covers every pair in the supported matrix, on both replica-set and sharded topologies: 6.0, 7.0, and 8.0 to themselves, and the lower-to-higher pairs 6.0-to-7.0, 6.0-to-8.0, and 7.0-to-8.0. This is what our CI tests cover. The contract has edges, and you should know them before you plan a migration around it:
That is the shape of what shipped, and it is enough to plan a migration around safely. Try itPercona ClusterSync for MongoDB 0.9.0 ships cross-version replication. The documentation has the setup and the supported matrix, the 0.9.0 release notes cover what landed, and the source is on GitHub. If you put it through a migration and something behaves unexpectedly, Percona Forum is the place to report it. The post Migrating from MongoDB 6.0 to 8.0: How Percona ClusterSync Handles Cross-Version Replication appeared first on Percona. | |||||||||||||||||||||||||
| Thursday, May 28th, 2026 | ||||||||||||||||||||||||||
| LJ.Rossia.org makes no claim to the content supplied through this journal account. Articles are retrieved via a public feed supplied by the site for this purpose. | ||||||||||||||||||||||||||
| 1:29 pm | Percona Operator for PostgreSQL 3.0.0: Hard Fork, OLM Scoping, Major Upgrades
All three land in service of the same goal: making 3.0.0 a clean, durable operational baseline for the operator’s next several years as an independent project. Future releases will be shaped by what the community asks for and contributes back. The public roadmap is the durable signal of that commitment. In this post, you will learn about:
Hard fork: CRDs renamed under upstream.pgv2.percona.com
The Percona Operator for PostgreSQL has, until now, been a soft fork. Custom Resources inherited from Crunchy PGO used the upstream postgres-operator.crunchydata.com API group. The two operators shared CRDs, which meant you could only run one of them in a given Kubernetes cluster. Installing both would lead to overlapping CRDs, conflicting webhooks, and finalizer collisions, so platform teams had to pick a side before they had finished evaluating. Starting with 3.0.0, every inherited CRD is renamed into a new dedicated upstream.pgv2.percona.com API group (K8SPG-1007). Percona’s own native CRDs (such as PerconaPGCluster under pgv2.percona.com/v2) are unchanged. The change applies to the inherited resources: PostgresCluster, PGUpgrade, PGAdmin, and the rest.
Coexistence: running both operators in the same clusterThe practical effect is that the Crunchy Data PostgreSQL Operator and the Percona Operator for PostgreSQL can now run on the same Kubernetes cluster at the same time, even in the same namespaces, with no CRD or webhook conflict. That unlocks a few real workflows: evaluating both operators on the same staging cluster without spinning up a second cluster, running existing Crunchy-managed clusters in some namespaces while bringing up new Percona-managed clusters in others, or testing a new database version on the Percona side while production stays on Crunchy until you are confident. The choice between the two operators stops being all-or-nothing.
Upgrade behavior for existing 2.x installsFor an existing install, the upgrade to 3.0.0 is mechanically simple. The operator creates the new-API-group CRDs alongside the legacy ones, then runs a one-time migration that updates dependent objects (Secrets, certificates, finalizer references) to point at the new CRD instances. Existing custom resources keep working through the legacy CRDs during the transition, and once migration completes, all reconciliation moves to the new group. Old PostgresCluster reference: apiVersion: postgres-operator.crunchydata.com/v1beta1 kind: PostgresCluster metadata: name: cluster1
apiVersion: upstream.pgv2.percona.com/v1beta1
kind: PostgresCluster
metadata:
  name: cluster1
Day-to-day, your PerconaPGCluster Custom Resource (the one most teams interact with directly) is unchanged. The rename mostly matters in three situations: when a kubectl filter or a GitOps repository hard-codes the old API group, when a CI pipeline references the legacy CRD by name, and when you run the Percona and Crunchy operators side by side and need them not to collide. Note: During the CRD migration on upgrade, the release notes report brief disruptions to pgBackRest operations (typically 1 to 2 minutes) while Kubernetes propagates certificate changes. Plan the upgrade during a maintenance window if backup continuity is critical, or pause scheduled backups during the upgrade. Full details on the API-group change are in the Percona PostgreSQL operator documentation.
Improved OLM namespace scoping for OpenShift
OpenShift users install operators through the OpenShift Lifecycle Manager (OLM), and OLM enforces an OperatorGroup to scope which namespaces an operator watches. In practice, 2.x had quirks: teams that selected “Single namespace” mode would sometimes see the operator reconciling CRs in other namespaces, and teams in “All namespaces” mode would sometimes see incomplete coverage when CRs were created in newly-added namespaces. 3.0.0 fixes this by aligning the operator’s namespace watch list with the OperatorGroup that OLM applies. All-namespaces installs watch all namespaces. Single-namespace installs respect the targetNamespaces set on the OperatorGroup.
Why it matters in shared infrastructureFor an OpenShift platform team running shared infrastructure, this distinction matters operationally. A typical setup has the database operator installed once in a platform namespace (such as openshift-operators) but expected to serve PerconaPGCluster resources owned by individual application teams in their own namespaces. If the operator over-reaches into namespaces it should not watch, RBAC noise multiplies. If it under-reaches, application teams file tickets about clusters that never reconcile. The 3.0.0 alignment with OperatorGroup semantics removes both failure modes.
OperatorGroup wiringFor users installing through OLM via the OpenShift web console, the install flow is unchanged. The fix is in how the operator’s reconciler interprets the OLM-supplied namespace scope after install. For users who manage OperatorGroups directly, a single-namespace install looks like this: apiVersion: operators.coreos.com/v1
kind: OperatorGroup
metadata:
name: percona-pg-operator-group
namespace: postgres-prod
spec:
targetNamespaces:
- postgres-prodAnd an all-namespaces install: apiVersion: operators.coreos.com/v1
kind: OperatorGroup
metadata:
name: percona-pg-operator-group
namespace: openshift-operators
spec: {}The empty spec: {} (or an OperatorGroup with no targetNamespaces) means “watch all namespaces” by OLM convention. The 3.0.0 operator now honors that.
Note: After you upgrade an existing 2.x install to 3.0.0, the operator may begin reconciling PerconaPGCluster resources in namespaces it had previously ignored due to the prior scoping bug. Audit existing CRs across your cluster before upgrading, especially if you have stale test clusters in unintended namespaces. The release notes call this out explicitly. Note for community vs certified bundle users: Community OLM bundles did not support cluster-wide (all-namespaces) mode in earlier versions, 3.0.0 adds it. Certified bundles already supported cluster-wide mode, but they used a separate stable-cw channel for it with 3.0.0 the channels are unified, so users upgrading from a certified stable-cw install need to switch their subscription channel to stable to receive the upgrade. For the full install workflow on OpenShift, see the OpenShift installation documentation.
| |||||||||||||||||||||||||
| Wednesday, May 27th, 2026 | ||||||||||||||||||||||||||
| LJ.Rossia.org makes no claim to the content supplied through this journal account. Articles are retrieved via a public feed supplied by the site for this purpose. | ||||||||||||||||||||||||||
| 12:02 pm | Migrate from Crunchy Data PostgreSQL Operator to Percona PostgreSQL Operator: Backup-Restore and PV Reuse
This is part 3 of a 3-part series on running PostgreSQL on Kubernetes with a fully open-source operator. Part 1 walked through the changing open-source landscape and announced the hard fork of the Crunchy Data PostgreSQL Operator into the fully independent Percona PostgreSQL Operator v3.0.0. Part 2 covered the standby cluster method, the safest migration path when downtime budget is tight. This post covers two simpler paths:
If you are landing here cold, start with part 1 for the why, then read Part 2 for the standby method. The rest of this post assumes you have already decided to migrate and want a tested playbook. Tested with
Different versions may have slight differences in CR fields or behavior. Always consult the official documentation for the operator and PostgreSQL version you are running.
What this post does NOT cover
1. Migration using backup and restoreThis is often the fastest and simplest path, especially when you do not need a live standby. You take a full backup of the Crunchy source cluster, then create a Percona cluster that automatically restores from that backup before its first start. Data written between the final backup and the application cutover is lost, so the migration window is the time between those two events. For a near-zero-downtime alternative, see part 2: standby cluster method.
Overview
| |||||||||||||||||||||||||
| Monday, May 25th, 2026 | ||||||||||||||||||||||||||
| LJ.Rossia.org makes no claim to the content supplied through this journal account. Articles are retrieved via a public feed supplied by the site for this purpose. | ||||||||||||||||||||||||||
| 10:51 am | Running TidesDB as a MySQL 9.7 storage engine tidesdb-mysql is an experimental build that was developed to verify how TidesDB, the LSM-tree key/value engine, can work with MySQL 9.7 as a storage engine. The current build is v0.2.4, and it’s an experiment, not a finished product. So you can use it in your tests if you also want to try TidesDB with MySQL and compare with MariaDB Why we made itThere was already a way to use TidesDB from SQL. It’s TideSQL, which loads the engine into MariaDB as ha_tidesdb, and it works fine. But it doesn’t work with MySQL. So we wanted TidesDB to work with MySQL 9.7. MariaDB and MySQL share a lot of history, but they are not the same. We couldn’t just recompile the MariaDB plugin against MySQL headers and call it done. The one thing that stayed put through all of it was TidesDB itself, doing exactly what it does anywhere else. Only the server wrapped around was changed. In result we got our implementation, so if you’re on MySQL, you no longer have to switch to MariaDB to give TidesDB a try. What it actually istidesdb-mysql is a loadable plugin, ha_tidesdb.so. The engine gets built on its own and loaded into the server at runtime, the same shape as the MariaDB version. It speaks the MySQL handler API and wires MySQL tables and indexes onto TidesDB column families. After it loads, TidesDB sits right next to InnoDB in SHOW ENGINES and you choose it per table. Getting startedAll you need is Docker. Pull the image and start it: docker pull perconalab/tidesdb-mysql:0.2.4 docker run -d --name tidesdb \ -e MYSQL_ROOT_PASSWORD=secret \ -p 3306:3306 \ perconalab/tidesdb-mysql:0.2.4 The plugin is baked into this image and loaded on boot, so there’s no INSTALL PLUGIN step to remember. Confirm the engine is live: docker exec tidesdb mysql -uroot -psecret \ -e "SELECT engine, support FROM information_schema.engines WHERE engine='TidesDB';" # TidesDB | YES
Now make a table and treat it like any other: CREATE DATABASE shop;
USE shop;
CREATE TABLE products (
id INT PRIMARY KEY AUTO_INCREMENT,
name VARCHAR(64) NOT NULL,
price DECIMAL(10,2) NOT NULL,
KEY idx_price (price)
) ENGINE=TIDESDB;
INSERT INTO products (name, price) VALUES ('Widget', 9.99), ('Gadget', 24.50);
SELECT * FROM products WHERE price < 20;
Transactions, secondary indexes, the usual SQL, it all behaves: START TRANSACTION; UPDATE products SET price = price + 1 WHERE name = 'Widget'; COMMIT;
Per-table TidesDB options ride along in MySQL’s ENGINE_ATTRIBUTE JSON field. MySQL doesn’t have MariaDB’s COMPRESSION=… grammar, so the options are identical but you write them differently: CREATE TABLE events (
id BIGINT PRIMARY KEY AUTO_INCREMENT,
msg TEXT
) ENGINE=TIDESDB
ENGINE_ATTRIBUTE='{"compression":"ZSTD","bloom_filter":true}';Compression accepts NONE, SNAPPY, LZ4, ZSTD, or LZ4_FAST. Server-wide knobs live in system variables such as tidesdb_default_compression, tidesdb_block_cache_size, tidesdb_compaction_threads, and tidesdb_flush_threads. The full list is in docs/build-and-load.md. Prove the crash recoveryWrite a handful of rows, kill the server with no clean shutdown, bring it back, and count what’s left: # 1. Write rows inside a transaction and COMMIT. docker exec -i tidesdb mysql -uroot -psecret <<'SQL' CREATE DATABASE IF NOT EXISTS t; CREATE TABLE IF NOT EXISTS t.kv (k INT PRIMARY KEY, v VARCHAR(32)) ENGINE=TIDESDB; BEGIN; INSERT INTO t.kv VALUES (1,'a'),(2,'b'),(3,'c'),(4,'d'),(5,'e'); COMMIT; SELECT COUNT(*) AS before_crash FROM t.kv; -- 5 SQL
docker kill -s KILL tidesdb
docker start tidesdb
until docker exec tidesdb mysql -uroot -psecret -e 'SELECT 1' >/dev/null 2>&1; do sleep 2; done
# 3. The committed rows are still there. docker exec tidesdb mysql -uroot -psecret \ -e "SELECT COUNT(*) AS after_crash FROM t.kv;" -- 5 after_crash should come back equal to before_crash. A few more things to tryCompression is the one people ask about first, so here’s a table that leans on it. We generate a couple thousand rows of repetitive text, which is exactly the shape ZSTD likes: CREATE TABLE logs (
id BIGINT PRIMARY KEY AUTO_INCREMENT,
level VARCHAR(8) NOT NULL,
body TEXT,
KEY idx_level (level)
) ENGINE=TIDESDB
ENGINE_ATTRIBUTE='{"compression":"ZSTD","bloom_filter":true}';INSERT INTO logs (level, body)
SELECT IF(RAND() < 0.2, 'warn', 'info'),
REPEAT('the quick brown fox jumps over the lazy dog ', 40)
FROM information_schema.columns
LIMIT 2000;SELECT level, COUNT(*) AS rows FROM logs GROUP BY level; SELECT id, LEFT(body, 30) AS preview FROM logs WHERE id = 1000; The rows go in compressed and come back out as the original text, so queries don’t change at all. If you want to confirm the option actually landed on the table rather than being silently dropped, ask the server what it stored: SHOW CREATE TABLE logs\G
-- ENGINE=TIDESDB ... ENGINE_ATTRIBUTE='{"compression":"ZSTD","bloom_filter":true}'The bloom filter from that same attribute is what keeps point lookups cheap once the data has compacted down into several on-disk files: SELECT id, level FROM logs WHERE id = 1500; A JSON column behaves the way you’d expect, including the ->> extraction operator: CREATE TABLE kv (k VARCHAR(64) PRIMARY KEY, v JSON) ENGINE=TIDESDB;
INSERT INTO kv VALUES
('en', JSON_OBJECT('lang','English', 'msg','hello')),
('es', JSON_OBJECT('lang','Spanish', 'msg','hola')),
('fr', JSON_OBJECT('lang','French', 'msg','bonjour'));
SELECT k, v->>'$.lang' AS language, v->>'$.msg' AS greeting
FROM kv
ORDER BY k;And the secondary index on products from earlier is a real index, not decoration. A range query uses it, and EXPLAIN will show idx_price in the key column: SELECT name, price FROM products WHERE price BETWEEN 5 AND 20 ORDER BY price; EXPLAIN SELECT name, price FROM products WHERE price BETWEEN 5 AND 20; What works, and what doesn’t yetQuite a bit works. The common column types are all there, primary keys single and composite, AUTO_INCREMENT, secondary indexes with index-condition pushdown, COMMIT/ROLLBACK, REPLACE and INSERT … ON DUPLICATE KEY UPDATE, online add/drop index, instant add column, full-text search, spatial indexes, per-row TTL, per-table compression and bloom filters, at-rest encryption, and mixed-engine transactions where a TidesDB table and an InnoDB table share one BEGIN … COMMIT. The functional test suite, which we lifted from TideSQL and then extended, passes 58 of 58 executed tests. A few things you should know about before you lean on it:
Treat v0.2.5 as a serious experiment. It’s solid enough that committed data rides through a crash, and it’s not something we’d point production traffic at yet. Try it, then tell usdocker pull perconalab/tidesdb-mysql:0.2.5 That’s the whole setup. Spin up a table with ENGINE=TIDESDB, run the crash demo, and point your own SQL at it. The source, the build scripts, and the engine patches all live in the tidesdb-mysql repository, and the durability fixes are written up in KNOWN-ISSUES.md. This is a tool made by users for users, so if you give it a spin, we’d genuinely like to hear what held up and what fell over. The post Running TidesDB as a MySQL 9.7 storage engine appeared first on Percona. | |||||||||||||||||||||||||
| LJ.Rossia.org makes no claim to the content supplied through this journal account. Articles are retrieved via a public feed supplied by the site for this purpose. | ||||||||||||||||||||||||||
| 7:49 am | Migrate from Crunchy Data PostgreSQL Operator to Percona PostgreSQL Operator: Standby Cluster Method
A Crunchy to Percona PostgreSQL migration is more straightforward than most cross-operator moves on Kubernetes, because the Percona PostgreSQL Operator is a hard fork of the Crunchy Data PostgreSQL Operator. Same Patroni HA, same pgBackRest backups, same overall CRD shape. This post walks through the safest of the three migration paths: a standby cluster method with near-zero downtime. This is part 2 of a 3-part series on running PostgreSQL on Kubernetes with a fully open-source operator. Part 1 walked through the changing open-source landscape and announced the hard fork of the Crunchy Data PostgreSQL Operator into the fully independent Percona PostgreSQL Operator v3.0.0. This post is the first practical playbook of the series. It covers the standby cluster method, the safest migration path when the downtime budget is tight. Part 3 will cover two simpler paths: backup-and-restore and persistent-volume reuse. If you are landing here without context on why you might want to migrate at all, start with part 1. The rest of this post assumes you have already decided to move and want a tested playbook.
Migration approach in one paragraphThe Percona PostgreSQL Kubernetes Operator is a hard fork of the Crunchy Data PostgreSQL Kubernetes Operator, which simplifies the migration paths considerably: the same underlying tools (Patroni, pgBackRest, PgBouncer) and the same overall design are used in both operators. All three migration paths in this series are reversible: because Percona’s operator is fully open source and remains compatible with the same backup format, the move back to Crunchy is also possible if your team decides to walk it
A note on the storage layerAll examples in this guide use an in-cluster SeaweedFS instance as the pgBackRest S3 repository. SeaweedFS is Apache-2.0 licensed, actively maintained, and a clean drop-in replacement for the role MinIO used to fill in this stack. Any other S3-compatible storage works just as well: AWS S3, Google Cloud Storage (via HMAC keys), Ceph RadosGW, Cloudflare R2, and so on. For non-SeaweedFS endpoints, remove repo1-s3-uri-style: path and repo1-s3-verify-tls: “n” from the pgBackRest configuration and replace the endpoint with your provider’s URL.
What this series does NOT coverTo keep scope honest:
Tested with
Different versions may differ slightly in CR fields or behavior. Always consult the official documentation for the operator and PostgreSQL version you are running.
Migration using a standby clusterThis is the safest method when the downtime budget is tight. The Percona cluster is brought up as a standby of the Crunchy primary, catches up via pgBackRest plus streaming replication, and is promoted at cutover. The only downtime is the cutover step itself. You can wire the standby in two ways, and combining both gives you maximum safety:
Overview
Before you beginSet the target namespace once. Every command in this guide reads from this variable, so you can change it in a single place: export MIGRATION_NS=postgres-migration kubectl create namespace $MIGRATION_NS
Deploy SeaweedFSSkip this step if you already have an S3-compatible repository (AWS S3, GCS, Ceph). Update the endpoint and credentials in the YAML examples accordingly. SeaweedFS provides an S3-compatible object store that runs inside Kubernetes. Both operators will use it as the shared pgBackRest WAL archive. TLS is required. pgBackRest always connects to S3 endpoints over HTTPS, even when repo1-s3-verify-tls: “n” is set (that flag skips certificate verification, it does not fall back to HTTP). The steps below generate a self-signed certificate and pass it to SeaweedFS via Helm values. # Generate a self-signed TLS certificate for SeaweedFS S3 openssl req -x509 -nodes -days 3650 -newkey rsa:2048 \ -keyout /tmp/seaweedfs.key \ -out /tmp/seaweedfs.crt \ -subj "/CN=seaweedfs-all-in-one" kubectl -n $MIGRATION_NS create secret tls seaweedfs-s3-tls \ --cert=/tmp/seaweedfs.crt \ --key=/tmp/seaweedfs.key helm repo add seaweedfs https://seaweedfs.github.io/seaweedfs/helm helm repo update helm install seaweedfs seaweedfs/seaweedfs \ --namespace $MIGRATION_NS \ --version 4.23.0 \ -f https://raw.githubusercontent.com/percona/percona-postgresql-operator/refs/heads/migration-from-crunchy-guide/e2e-tests/tests/migration-from-crunchy-standby/examples/seaweedfs-values.yaml \ --wait The Helm values file in the repo creates the pg-migration bucket on first start, so no separate aws s3 mb step is needed.
Step 0. Create pgBackRest secretsBoth operators need credentials to read and write the shared SeaweedFS bucket. Apply the secrets from examples/01-pgbackrest-secret.yaml after filling in your access key and secret key: # Copy and edit the file first to set your credentials. kubectl apply -n $MIGRATION_NS \ -f https://raw.githubusercontent.com/percona/percona-postgresql-operator/refs/heads/migration-from-crunchy-guide/e2e-tests/tests/migration-from-crunchy-standby/examples/01-pgbackrest-secret.yaml Both secrets contain the same SeaweedFS credentials (pgmigration / pgmigration123). For AWS S3, replace those with your IAM access key ID and secret access key.
Step 1. Start with your existing Crunchy Data clusterIf you already have a running Crunchy cluster, ensure its pgBackRest repo1 points at the shared bucket and path. The repo1-path value must be identical in both cluster specs. Mismatched paths will prevent the Percona standby from finding the WAL archive. The Helm install below is shown only as a quick way to reproduce this blog post’s example. The migration steps in the rest of this post do not depend on how you deployed the source operator. Optional: deploy a Crunchy operator to test the migration end to end: helm install pgo \ oci://registry.developers.crunchydata.com/crunchydata/pgo \ -n $MIGRATION_NS \ --version 5.8.7 \ --set singleNamespace=true \ --wait
kubectl apply -n $MIGRATION_NS \
  -f https://raw.githubusercontent.com/percona/percona-postgresql-operator/refs/heads/migration-from-crunchy-guide/e2e-tests/tests/migration-from-crunchy-standby/examples/02-crunchy-source-cluster.yaml
global:
  repo1-path: /crunchy-to-percona/repo1   # shared path, must match Percona side
  repo1-s3-uri-style: path                # required for path-style S3 endpoints (SeaweedFS, MinIO)
  repo1-s3-verify-tls: "n"                # skip TLS verification for self-signed cert; remove for AWS S3
repos:
  - name: repo1
    s3:
      bucket: pg-migration
      endpoint: seaweedfs-all-in-one.postgres-migration.svc.cluster.local:8443
      region: us-east-1
kubectl wait pod \
  --selector postgres-operator.crunchydata.com/cluster=crunchy-source,postgres-operator.crunchydata.com/data=postgres \
  --namespace $MIGRATION_NS \
  --for=condition=Ready \
  --timeout=300s
| |||||||||||||||||||||||||
| Friday, May 22nd, 2026 | ||||||||||||||||||||||||||
| LJ.Rossia.org makes no claim to the content supplied through this journal account. Articles are retrieved via a public feed supplied by the site for this purpose. | ||||||||||||||||||||||||||
| 7:33 am | MySQL 9.7.0 PGO Benchmark Analysis OverviewServers Tested:
Tier Configurations:
View ResultsThe benchmark reports are available as interactive HTML pages at: https://percona-lab-results.github.io/20 Performance GraphsTier 2G (2GB Buffer Pool):
Tier 12G (12GB Buffer Pool): Tier 32G (32GB Buffer Pool):
Key Findings
| |||||||||||||||||||||||||
| Wednesday, May 20th, 2026 | ||||||||||||||||||||||||||
| LJ.Rossia.org makes no claim to the content supplied through this journal account. Articles are retrieved via a public feed supplied by the site for this purpose. | ||||||||||||||||||||||||||
| 3:13 pm | CVE-2026-8053: “We don’t use time-series” is not a mitigation TL;DR: A bug in MongoDB’s time-series collection code allows a user with the standard
Every time a bug like this lands, the same conversation plays out in incident channels across the industry. Are we affected? We don’t even use time-series collections! Heads nod. Everyone moves on. That’s the mistake. CVE-2026-8053 is an out-of-bounds memory write in MongoDB’s time-series collection — specifically in the internal mapping between measurement field names and column indexes. Under the right input, the mapping drifts out of sync with the underlying buffer and
Upstream tracking lives at SERVER-126021. CVSS v3.1 puts it at 8.8. CVSS v4.0 puts it at 8.7. The labels say “High.” How that “High” translates into your week depends on a couple of assumptions worth questioning. Read literally, the prerequisite is “an authenticated user with database write privileges.” Read operationally, that bar is lower than most teams treat it as. The mitigation you think you have doesn’t existModern stacks have dozens of service accounts, with secrets scattered across config files, pipelines, and laptops you’ve long forgotten about. Others end up in log files on bad days. And every user with write access to your cluster sits one step away from the vulnerable code path. In a world like that, “the attacker would need credentials first” isn’t a speed bump — it’s a shrug. So the real question was never authenticated vs. unauthenticated. It’s what authentication unlocks. Here, it unlocks Remote Code Execution (RCE), which is exactly what the CVSS score is trying to tell you — even if the industry’s reaction hasn’t quite caught up. Attackers don’t need your time-series collection to already exist – they just need someone’s credentials in the wrong hands, and there are more ways for that to happen than most teams want to admit. I’m not raising this to be smug. I’m raising it because too many incident channels keep stalling on the wrong question. It isn’t: “Does our app use time-series?” It’s: “What can a user holding our readWrite role actually do this week?” Until you patch, the answer is more than you think. What Percona is shipping, and when?
6.0 is on the End-Of-Life (EOL) track. The easy call would be to point at the lifecycle page, note that the upgrade conversation is overdue, and stop there. We’re shipping the fix anyway. Customers running 6.0 in production have real reasons they haven’t migrated yet — frozen application stacks, certification cycles, dependencies that don’t move on quarterly cadences — and none of those reasons are worth exploiting while a migration plan gets approved. Percona is not building binary packages for the 5.x line. We’re being upfront about that — the calculus on extended support has a limit, and 5.x is past it for us. But the fix itself is already in our public release branch: release-5.0.33-26. If you have a hard requirement on 5.x and the time pressure to meet it, the source is available for building. Percona customers on 5.x can open a ticket, and we’ll work on the case individually. What to do this week?Patch! Specifically:
As usual, you can download patches from your package manager or Percona Software Downloads page. If you’re running PSMDB on Kubernetes via the Percona Operator for MongoDB, edit the image tag in your While you’re in there, audit your custom roles. Anything granting Questions, sharp disagreements, or a 5.x build that won’t compile? Find us on the Percona Forum or, if you’re a customer, in your support portal. If you want to become one and ensure your databases run, check out Percona Services. The post CVE-2026-8053: “We don’t use time-series” is not a mitigation appeared first on Percona. | |||||||||||||||||||||||||
| LJ.Rossia.org makes no claim to the content supplied through this journal account. Articles are retrieved via a public feed supplied by the site for this purpose. | ||||||||||||||||||||||||||
| 2:45 am | Manually Migrate Hash Slots in a Valkey/Redis Cluster This article explains how to manually migrate hash slots in Valkey/Redis clusters to expand your deployment with minimal disruption to availability. Note: Valkey 9.0 introduces the Atomic Slot Migration (ASM) feature, which significantly improves migration speed (up to 9.52 times faster) and reliability, while reducing migration complexity. So you should use ASM instead if you are using Valkey version 9.0 and later. You can read more about ASM in the Valkey’s community blog. Refresher on hash slotsValkey and Redis clusters partition their keyspace into 16,384 hash slots. Each key is assigned to a slot based on the CRC16 hash of its name (or hashtag), ensuring consistent and deterministic routing across cluster nodes: CRC16(<key>) % 16384 So, for example, the command Accessing keys in different slotsBecause hash slots in Valkey/Redis can be located on different processes, if you access multiple slots in a single command, the cluster would have to coordinate between nodes. This can impact cluster performance and data consistency, as nodes can fail while processing a command. So, to keep things simple and fast, Valkey/Redis will disallow accessing keys that hash to different slots. You can read more about distributing data in Valkey/Redis cluster in my colleague Agustin’s blog post. Why do you need to migrate hash slots?As your dataset grows, your Valkey/Redis cluster may not have enough memory to hold all the data; or the resource utilization between nodes is not evenly distributed. To address these issues, you might need to add more nodes to the cluster, or move the hash slots around so that data doesn’t get evicted, and no nodes are under/overutilized. How the slot migration process worksThe slot migration process can be roughly divided into 3 steps: 1. Update the hash slot’s state so that clients can know where to get the keys during the migration stage: CLUSTER SETSLOT <slot> IMPORTING <source ID> CLUSTER SETSLOT <slot> MIGRATING <target ID> 2. CLUSTER GETKEYSINSLOT <slot> <number of keys to return> MIGRATE <target host> <target port> "" 0 5000 KEYS <key1> <key2> ... <keyN> 3. Update the hash slot’s metadata to reflect the new ownership: CLUSTER SETSLOT <slot> NODE <target ID>
What happens when the hash slot is accessed during migrationDuring hash slot migration, if a command accesses keys stored in the migrating slot, the instance will first check its local hash table. If the keys are not found locally, the client will receive an 127.0.0.1:30002> GET 123 -> Redirected to slot [5970] located at 127.0.0.1:30001 "123" 127.0.0.1:30001> GET 123 -> Redirected to slot [5970] located at 127.0.0.1:30002 -> Redirected to slot [5970] located at 127.0.0.1:30001 "123" Commands executed during migration may fail if they access keys that are distributed across different nodes. In this case, the command will encounter the same limitation as a
If the target node is the one receiving commands, the flow is much easier. It just checks if you are following an
So, during the slot migration, your request will be redirected at most twice, first to the source node (since it is still registered as the owner of the hash slot), then to the target node if the keys are not found on the source: # connect to the target node, and GET a non-existent key
valkey-cli -c -p 30001
127.0.0.1:30001> GET {123}1
-> Redirected to slot [5970] located at 127.0.0.1:30002
-> Redirected to slot [5970] located at 127.0.0.1:30001
(nil)
Why using
| |||||||||||||||||||||||||
| Tuesday, May 19th, 2026 | ||||||||||||||||||||||||||
| LJ.Rossia.org makes no claim to the content supplied through this journal account. Articles are retrieved via a public feed supplied by the site for this purpose. | ||||||||||||||||||||||||||
| 5:12 pm | Not All Open Source Is Equal: Choosing a PostgreSQL Operator for Kubernetes in 2026
This is part 1 of a 3-part series on running PostgreSQL on Kubernetes with a fully open-source operator.
In this post, you will learn about:
Open source isn’t what it used to be
| |||||||||||||||||||||||||
| LJ.Rossia.org makes no claim to the content supplied through this journal account. Articles are retrieved via a public feed supplied by the site for this purpose. | ||||||||||||||||||||||||||
| 1:08 pm | Keeping pgBackRest Open, Healthy, and Community Driven When the future of pgBackRest suddenly became uncertain, the PostgreSQL ecosystem reacted quickly.
but:
That distinction matters. pgBackRest is critical infrastructure used by enterprises around the world to protect some of their most important data. When projects like this face maintainership or sustainability challenges, organizations need trusted open source partners that can help provide continuity, stability, and confidence. Supporting continuity, not fragmentationFrom the beginning, Percona believed the best outcome for pgBackRest was not fragmentation, forks, or closed alternatives. What the project needed was continuity. That meant working collaboratively across the ecosystem to help strengthen the project itself: – coordinating funding discussions A healthier future for pgBackRestThose efforts are already producing results. The role of trusted open source partnersAt Percona, this is not simply a business decision. It reflects how we see open source itself: the strongest ecosystems are built in the open, through collaboration, shared responsibility, and long-term commitment.
The post Keeping pgBackRest Open, Healthy, and Community Driven appeared first on Percona. | |||||||||||||||||||||||||
| Friday, May 8th, 2026 | ||||||||||||||||||||||||||
| LJ.Rossia.org makes no claim to the content supplied through this journal account. Articles are retrieved via a public feed supplied by the site for this purpose. | ||||||||||||||||||||||||||
| 1:52 am | Bringing pt-query-digest-Style Slow Query Analysis to PostgreSQL with pg_enhanced_query_logging In this blog post, we are going to briefly discuss
pg_enhanced_query_logging (PEQL for short), a PostgreSQL extension that produces slow query logs in the same format MySQL and Percona Server users have been feeding into pt-query-digest for years. The idea is simple: reuse the tried-and-true tools and concepts we have been using for performing full query audits with low performance hits. This tool was conceived and developed for the recent Percona Build with AI Competition.A quick word of caution before we begin: PEQL is under active development and has not been validated for production use. We will use it in a development environment here, and you should do the same.
Why a new slow log for PostgreSQL?Out of the box, PostgreSQL gives us
log_min_duration_statement and a handful of related GUCs that print slow queries to the server log. That is useful, but the format is line-oriented and mixed in with everything else PostgreSQL writes there. On the MySQL side, the Percona Server extended slow query log goes much further: per-query counters, lock and I/O times, plan-quality flags, and a structured format that pt-query-digest can group by query fingerprint and rank by total time, average time, lock time, etc. This introduces the more powerful concept of performance of a family of queries, and not just individual query executions.PEQL ports that same workflow to PostgreSQL. It hooks into the executor and planner, captures timing, buffer I/O, WAL, JIT and row-count metrics for every query slower than a configurable threshold, and writes them to a dedicated log file using a pt-query-digest-compatible format.
Motivation and benefitsThe original idea behind this extension is doing query audits with minimal impact on the running server. We want to be able to ask “what queries will we benefit more from tuning?” without paying for it in latency, I/O or in a flood of unrelated log lines.
That goal drives most of the design decisions:
Installing the extensionPEQL is a regular PGXS extension, to build it we can execute the following steps:
git clone https://github.com/guriandoro/pg_enhanced_query_logging.git
cd pg_enhanced_query_logging
make USE_PGXS=1
sudo make install USE_PGXS=1
This installs the shared library into
$(pg_config --pkglibdir) and the SQL/control files into $(pg_config --sharedir)/extension/. The hooks live in the shared library, so we need to preload it. Add the following line to postgresql.conf (or edit your current value to include it):shared_preload_libraries = 'pg_enhanced_query_logging' Restart PostgreSQL, and then create the extension in any database where we want the SQL helper functions:
CREATE EXTENSION pg_enhanced_query_logging; To easily test it, the repository ships a Docker-based quick start that builds Rocky Linux 9 + PostgreSQL 18 with the extension preloaded:
./test/deploy_docker_pg18_rhel.sh
A minimal configurationFor a first look, the easiest thing to do is to log every query at full verbosity:
shared_preload_libraries = 'pg_enhanced_query_logging'
peql.log_min_duration = 0 # log every query
peql.log_verbosity = 'full' # emit all metric lines
While we are at it, we can also silence PostgreSQL’s native query logging so we have a single place to look:
log_statement = 'none'
log_min_duration_statement = -1
log_duration = off
By default, PEQL writes to
peql-slow.log inside PostgreSQL’s log_directory. The location and filename are configurable via peql.log_directory and peql.log_filename.What an entry looks likeAfter running a few queries, opening
peql-slow.log shows entries like this one (trimmed for brevity):# Time: 2026-03-11T09:15:32.847291 # User@Host: app_user[app_user] @ 10.0.1.42 [] # Thread_id: 48712 Schema: mydb.public # Query_id: -6432758210044805760 # Query_time: 1.285034 Lock_time: 0.000000 Rows_sent: 256 Rows_examined: 87500 # Shared_blks_hit: 4096 Shared_blks_read: 312 Shared_blks_dirtied: 0 Shared_blks_written: 0 # Temp_blks_read: 0 Temp_blks_written: 48 # Shared_blk_read_time: 0.024310 Shared_blk_write_time: 0.000000 # WAL_records: 0 WAL_bytes: 0 WAL_fpi: 0 # Plan_time: 0.003210 # Full_scan: Yes Temp_table: No Temp_table_on_disk: Yes Filesort: Yes Filesort_on_disk: No # JIT_functions: 4 JIT_generation_time: 0.001250 JIT_emission_time: 0.003100 SET timestamp=1741680931; SELECT o.id, o.total, c.name FROM orders o JOIN customers c ON c.id = o.customer_id WHERE o.status = 'pending' ORDER BY o.total DESC LIMIT 256; The full breakdown of every field, with the GUCs that produce it, lives in doc/annotated-sample.md. This is a great place to start reading the documentation.</p>
Feeding it to pt-query-digestBecause the format mirrors the MySQL slow log, we can point
pt-query-digest at it directly:pt-query-digest --type slowlog $(pg_config --logdir)/peql-slow.log We get the familiar profile at the top (queries grouped by fingerprint, ranked by total time), followed by the per-query detail blocks. The plan-quality flags above can also be used as filters, for example to look only at queries that did a sequential scan:
pt-query-digest --type slowlog \
--filter '$event->{Full_scan} eq "Yes"' \
$(pg_config --logdir)/peql-slow.log
If you do not have pt-query-digest installed, the standalone script can be downloaded directly:</p>
curl -LO https://percona.com/get/pt-query-digest
chmod +x pt-query-digest
Example
A few useful knobsOnce we move beyond logging everything, there are a handful of GUCs worth knowing about:
The full list, with default values and contexts, is documented in doc/configuration.md.
Future workThe
pt-query-digest compatibility is a feature, but it’s also a constraint: the MySQL slow log format was designed to be human readable, which means it’s way too verbose. For instance, the plan-quality flags line only has 5 bits of actual information, but uses around 100 bytes to encode them:# Full_scan: Yes Temp_table: No Temp_table_on_disk: No Filesort: Yes Filesort_on_disk: No We can do this better by simply logging
YNNYN or 10010 (hence the 5 bits of information mentioned above), and have the position within the query log entry make it self-explanatory as to what this information is.This is a 20x amplification factor! And other lines suffer of similar issues… Multiply that by every query on a busy server and the overhead adds up quickly, both in disk space and in the I/O the backend has to do to write the entries out.
There are two pieces of follow-up work we have in mind to address this:
If any of this sounds interesting and you would like to help shape it, the repository’s doc/contributing.md is the right place to start.
ConclusionPostgreSQL has had rich per-query metrics available for a while now, but stitching them together into the kind of “show me the worst-performing family of queries from the last hour” workflow MySQL users have enjoyed for years has taken more effort. PEQL closes that gap by emitting a single, pt-query-digest-compatible log file with timing, buffer, WAL, JIT and plan-quality data attached to every query.
If you want to dig deeper, the doc/ directory in the repository has detailed pages on the output format, the architecture of the hooks, the rate limiter and the disk-space protection logic. And if you have not used
pt-query-digest before, this is a great time to do it!The post Bringing pt-query-digest-Style Slow Query Analysis to PostgreSQL with pg_enhanced_query_logging appeared first on Percona. | |||||||||||||||||||||||||
| Tuesday, May 5th, 2026 | ||||||||||||||||||||||||||
| LJ.Rossia.org makes no claim to the content supplied through this journal account. Articles are retrieved via a public feed supplied by the site for this purpose. | ||||||||||||||||||||||||||
| 5:12 pm | PSMDB Sandbox: A Browser-Based UI for Deploying MongoDB with Terraform and Ansible If you’ve ever wrestled with .tfvars files, juggled Ansible inventory paths, or tried to remember the exact command sequence for a MongoDB setup — this post is for you. PSMDB Sandbox is a lightweight web frontend built in Go that ships inside the Percona MongoDB Automation repository. It puts a clean browser interface on top of the full Terraform + Ansible automation stack, so you can spin up, manage, and tear down MongoDB environments without ever touching a config file by hand. This project was built using vibe coding — the result is a fully functional application developed rapidly without writing every line from scratch. It’s a great example of how AI-assisted development can accelerate tooling projects that would otherwise sit in the backlog forever. Why a Web UI?The mongo_terraform_ansible project already automates a lot: it can deploy Percona Server for MongoDB (PSMDB), Percona Backup for MongoDB (PBM), and Percona Monitoring and Management (PMM) across AWS, GCP, Azure, Docker, and Libvirt/KVM. That’s powerful — but the workflow traditionally meant editing .tfvars files, running commands in the right order, and tracking state in your head. The Go UI changes that. It wraps the same Terraform and Ansible automation in a wizard-style interface, streams live output to your browser, and keeps track of environment state so you always know what’s running, stopped, or in progress. It’s particularly useful as a testing sandbox for PSMDB features. You can quickly spin up a replica set or sharded cluster, test backup and restore workflows with PBM, explore audit logging, and observe everything through PMM monitoring — all from the browser, and all torn down just as easily when you’re done. What You Can ConfigureCluster TopologyDefine how many clusters and replica sets you want, the number of nodes per replica set, and whether to deploy a sharded cluster or a simple replica set. Each cluster is independently configurable. PSMDB Version and PackagesPick the exact Percona Server for MongoDB release you want to test — package identifiers are fetched automatically from the Percona repository listing on startup, so you’re always selecting from what’s genuinely available. For Docker-based environments, image tags are pulled live from Docker Hub and cached for five minutes. Backup and Restore with PBMPercona Backup for MongoDB (PBM) can be included in the deployment. PBM is configured with the native storage backend for the supported environments (e.g. an S3 bucket is automatically created for AWS). This makes the sandbox ideal for testing backup policies, point-in-time recovery, and restore scenarios without touching production. PMM MonitoringYou can include a PMM Server in your environment so every PSMDB node is monitored from the moment it comes up. This makes it straightforward to test alerting rules, explore query analytics, or simply validate that your monitoring setup looks right before applying it elsewhere. Live Deployment LogsWhen you hit Deploy, the UI kicks off terraform init && terraform apply (plus Ansible playbooks for cloud platforms) in a background goroutine and streams the output directly to your browser via Server-Sent Events. No more tailing log files in a separate terminal. Hosts & Connections PanelAfter a successful deployment, the environment detail page shows every host (or container) with:
Stop, Restart, Reset, and DestroyFull lifecycle management is available from the UI. For Docker environments, Stop and Restart call docker stop / docker restart filtered by the environment’s prefix. For cloud environments, the corresponding Ansible stop.yml and restart.yml playbooks run. Destroy calls terraform destroy and, on success, automatically cleans up the inventory and redirects you back to the environments list. Getting Startedgit clone https://github.com/percona/mongo_terraform_ansible.git cd mongo_terraform_ansible/ui-go go run . Then open http://127.0.0.1:5001 in your browser. If you prefer a compiled binary: go build -o mongodeploy . ./mongodeploy You can customize the bind address and port with environment variables: Security note: The UI is designed for local use. It binds to 127.0.0.1 by default. Don’t expose it to the public internet without adding authentication. Try It and Share Your FeedbackPSMDB Sandbox is a community-contributed tool. If you try it out, run into issues, or have ideas for improvements, open an issue or pull request on GitHub. The project is licensed under Apache 2.0. Happy deploying!
The post PSMDB Sandbox: A Browser-Based UI for Deploying MongoDB with Terraform and Ansible appeared first on Percona. | |||||||||||||||||||||||||
| Monday, May 4th, 2026 | ||||||||||||||||||||||||||
| LJ.Rossia.org makes no claim to the content supplied through this journal account. Articles are retrieved via a public feed supplied by the site for this purpose. | ||||||||||||||||||||||||||
| 12:43 pm | I Know Kung Fu You might find this hard to believe, but AI has become kind of a thing around here. Bennie published a post on our Build with AI competition last week, in which he shared that I was lucky enough to land the second place prize. Genuinely flattered, and a real thank you to Peter F, PZ, Vadim, and Bennie for organizing it. The recognition is great. But the part that does not quite come through in the recap is what those six weeks actually felt like from the inside. Forty-plus submissions, 10+ teams, marathon demo sessions that ran out of time twice over, and a constant drumbeat of ideas where every fifth one made me think “wait, we can just… ship that?” Two submissions that really impressed me (and are worthy of high praise): Kedar Vaijanapurkar shipped a four-tool MySQL stack (Advisor, random data generator, CleanPrompt, and a Query Reviewer), any one of which on its own would have been a strong submission. And Daniil built a leaderboard for Percona ecosystem contributors plus a vector-search prototype running on Percona’s own products, which is exactly the dogfood story we want. There were a lot more than three projects worth backing, which is part of why a second contest round is being coordinated later this year. A lot of the entries are not waiting for it either – they are already developing into real, operational utilities (some of mine included). The two submissions of my own that I would point to first are IBEX and percona-dk. IBEX (Integration Bridge for EXtended systems) is a local MCP multi-tool server that connects either a local model or a Percona-owned LLM to the systems where the most valuable context actually lives. Slack, Notion, Jira, ServiceNow, Salesforce, etc. A solution was needed here since we could not point the standard Claude or ChatGPT connectors at our sensitive internal data, and obviously most of the context that makes LLMs so valuable is precisely that kind of data. percona-dk is the other one. It started as a way to keep AI honest about our own products by giving the AI tools our teams use (Claude, Cursor, anything that speaks MCP) direct access to Percona’s documentation, so the answer to a question about our products comes from real docs with linked citations instead of stale training data or even scraped web results that can get things wrong. It has evolved a fair bit since the contest. The Percona Community blog and forums are now indexed alongside the docs, Perconians are getting real day-to-day value out of it, and it is starting to look like the kind of thing that could grow into a community utility (perhaps even beyond Percona docs). Those two were just the start. Once IBEX worked, I needed shared memory across LLMs, so I built that. Once I had three MCP servers running, the boilerplate got annoying, so I built CAIRN, a scaffolding tool that builds on Anthropic’s official MCP builder skill. The official skill walks you through writing a server step by step, but CAIRN spins up a complete, working project in minutes with a streamlined install wizard for non-technical users. It is now in the hands of other Perconians building their own MCP tools, and providing real value of its own. Then I learned about .mcpb files and Desktop Extensions (.dxt), packaged everything that way, and stood up an internal Claude plugin marketplace so any Perconian can install the lot from one place. Each layer opened a door I did not know existed until I was already through it. Some of those doors seemingly materialized from thin air as they magically aligned with new releases from Anthropic. What started as a competition entry is now a small internal ecosystem. I am still a product person, not a software engineer. I am not going to pretend any of the code is pristine, and a lot of it was vibe-coded with Claude as a partner. But the architecture holds together, it works, and most of it is in daily use by people who are not me. That last part is the bit I am most proud of. The next batch is pointed squarely at product operations. Making customer signals legible. Making internal telemetry something any teammate can talk to in plain English. The early returns are promising, and what gets me most excited is not the tech itself, it is watching people across Product, Engineering, and Support pull in the same direction with an AI colleague in the room. Turns out the interesting part of AI at work is not the model. It is the connective tissue. I know Kung FuFor a product guy who does not code for a living, this era is my “I know kung fu” moment. Not because I suddenly learned to fight. Because the move set I already had – product judgment, systems thinking, customer empathy, the ability to spec a thing precisely – just got a massive upgrade. The gap between “that would be useful” and “that exists now” is short enough to cross in an evening. I do not see it getting longer again. Thanks for reading this far. If you want more detail or want to try anything not linked here, ping me. I am happy to share more. The post I Know Kung Fu appeared first on Percona. | |||||||||||||||||||||||||
| LJ.Rossia.org makes no claim to the content supplied through this journal account. Articles are retrieved via a public feed supplied by the site for this purpose. | ||||||||||||||||||||||||||
| 5:45 am | Curious case of PXC node that refused to start due to SSL In this blog, I am going to share a real-world debugging case study where a routine Percona XtraDB Cluster node restart led to an unexpected failure. I will walk through what we observed, what we checked, and how we ultimately identified the root cause. Let’s see how the maintenance goes. It was supposed to be a simple restart. The kind you’ve done a hundred times. You SSH in, run the maintenance, bring the node back up, and go grab a coffee. Except this time, the coffee went cold on the desk… because MySQL refused to start. The ProblemThe error log of Percona XtraDB Cluster (8.0) had the following information: 2025-11-05T05:26:10.982984Z 0 [ERROR] [MY-000059] [Server] SSL error: Unable to get certificate from '/var/lib/mysql/server-cert.pem'.
2025-11-05T05:26:10.983030Z 0 [Warning] [MY-013595] [Server] Failed to initialize TLS for channel: mysql_main. See below for the description of exact issue.
2025-11-05T05:26:10.983045Z 0 [Warning] [MY-010069] [Server] Failed to set up SSL because of the following SSL library error: Unable to get certificate
2025-11-05T05:26:10.983052Z 0 [Note] [MY-000000] [WSREP] New joining cluster node configured to use specified SSL artifacts
2025-11-05T05:26:10.983083Z 0 [Note] [MY-000000] [Galera] Loading provider /usr/lib64/galera4/libgalera_smm.so initial position: 07c67757-0d18-11ef-b5a9-ee5d87b39aa8:4147053897
2025-11-05T05:26:10.983098Z 0 [Note] [MY-000000] [Galera] wsrep_load(): loading provider library '/usr/lib64/galera4/libgalera_smm.so'
2025-11-05T05:26:10.983742Z 0 [Note] [MY-000000] [Galera] wsrep_load(): Galera 4.22(f6c0465) by Codership Oy <info@codership.com> (modified by Percona <https://percona.com/>) loaded successfully.
2025-11-05T05:26:10.983771Z 0 [Note] [MY-000000] [Galera] Resolved symbol 'wsrep_node_isolation_mode_set_v1'
2025-11-05T05:26:10.983784Z 0 [Note] [MY-000000] [Galera] Resolved symbol 'wsrep_certify_v1'
2025-11-05T05:26:10.983807Z 0 [Note] [MY-000000] [Galera] CRC-32C: using 64-bit x86 acceleration.
2025-11-05T05:26:10.983995Z 0 [Note] [MY-000000] [Galera] not using SSL compression
2025-11-05T05:26:10.984341Z 0 [ERROR] [MY-000000] [Galera] Bad value '/var/lib/mysql/server-cert.pem' for SSL parameter 'socket.ssl_cert': 336245135: 'error:140AB18F:SSL routines:SSL_CTX_use_certificate:ee key too small'
at /mnt/jenkins/workspace/pxc80-autobuild-RELEASE/test/rpmbuild/BUILD/Percona-XtraDB-Cluster-8.0.42/percona-xtradb-cluster-galera/galerautils/src/gu_asio.cpp:ssl_prepare_context():471
2025-11-05T05:26:10.984401Z 0 [ERROR] [MY-000000] [Galera] Failed to create a new provider '/usr/lib64/galera4/libgalera_smm.so' with options 'gcache.size=1G;gcache.recover=yes;socket.ssl=yes;socket.ssl_ca=/data00/mysqldata/ca.pem;socket.ssl_cert=/data00/mysqldata/server-cert.pem;socket.ssl_key=/data00/mysqldata/server-key.pem;socket.ssl_key=/var/lib/mysql/server-key.pem;socket.ssl_ca=/var/lib/mysql/ca.pem;socket.ssl_cert=/var/lib/mysql/server-cert.pem': Failed to initialize wsrep provider
2025-11-05T05:26:10.984434Z 0 [ERROR] [MY-000000] [WSREP] Failed to load provider
2025-11-05T05:26:10.984448Z 0 [ERROR] [MY-010119] [Server] Aborting
2025-11-05T05:26:10.984602Z 0 [System] [MY-010910] [Server] /usr/sbin/mysqld: Shutdown complete (mysqld 8.0.42-33.1) Percona XtraDB Cluster (GPL), Release rel33, Revision 6673f8e, WSREP version 26.1.4.3.
2025-11-05T05:26:10.985473Z 0 [ERROR] [MY-010065] [Server] Failed to shutdown components infrastructure.
MySQL was down, and the maintenance clock was running. The certificate file sitting at SET GLOBAL ssl_ca = '/var/lib/mysql/ca.pem'; SET GLOBAL ssl_cert = '/var/lib/mysql/server-cert.pem'; SET GLOBAL ssl_key = '/var/lib/mysql/server-key.pem'; ALTER INSTANCE RELOAD TLS; Clients connected over TLS. Galera nodes communicated securely. There were zero complaints from the error log. Checking Usual SuspectsFile permissions We checked the PEM files. Ownership: We compared them against the other Galera nodes, and they were identical. This didn’t look like a permissions problem. Is SELinux to blame here? SELinux has ruined enough DBA time that it is one of the top spots on such checklists – but it was permissive. $ getenforce
PermissiveThat means it was logging any security issues, but not blocking. And there were no AVC denials related to MySQL or the PEM files in /var/log/audit/audit.log or dmesg! File corruption Did the files get corrupted/replaced during or before the MySQL restart? $ openssl x509 -in /var/lib/mysql/server-cert.pem -noout -text # Output looked perfectly valid when compared to the output from other nodes $ openssl rsa -in /var/lib/mysql/server-key.pem -check RSA key ok The files were fine. They parsed cleanly. OpenSSL could read them. So why couldn’t MySQL? More Logs review We scanned /var/log/messages and journalctl for anything unusual around the time of the restart. No disk errors. No OOM kills. No kernel panics. Nothing that screamed “I am the Dhurandhar that’s destroyed your node.” At this point, most of the usual suspects were guilt-free, staring at us, asking, “Who did it?” The ClueIt is good to communicate with stakeholders, and we did – “Was there any recent change on your side?” to the client, and then uttered the golden words “Last week the crypto-policy was updated on all of the DB servers to comply with PCI.” PCI > Crypto-policy – Let’s go and check it !! $ update-crypto-policies --show FUTURE The system was running RHEL’s FUTURE cryptographic policy. For those unfamiliar (including me at the time), Red Hat Enterprise Linux (and its derivatives, such as Rocky, Alma, and Oracle Linux) ships with a system-wide cryptographic policy framework. It’s a centralized way to enforce minimum standards for TLS versions, cipher suites, key lengths, and signature algorithms across all applications on the system that include OpenSS and yes, anything that links against those libraries… like MySQL. Here’s a table that shows information about the crypto-policy levels:
So FUTURE demands a 3072-bit RSA key; otherwise, it is blocked. What do we have? $ openssl rsa -in server-key.pem -text -noout | head -1 RSA Private Key: (2048 bit, 2 primes) 2048 bits! C’mon! And now I recall the error log again… The hint was there: error:140AB18F:SSL routines:SSL_CTX_use_certificate:ee key too small Now we have our story straight. FixtureThe quick fix here would be to adjust the policy to DEFAULT. sudo update-crypto-policies --set DEFAULT This will accept the current SSLs, and the node will join the cluster readily. Alternatively, to remain compliant and adhere to the security policy strictness, the fixture will be to
ConclusionThis was a classic case of a problem hiding at the boundary between two domains, database administration and operating system security. The DBA saw valid certificates and correct MySQL configuration. The sysadmin saw a properly hardened system with a strong crypto policy. Neither was wrong. But the intersection of their two correct configurations produced a failure. This incident reinforces the importance of cross-domain awareness, where resolving database issues sometimes requires understanding and challenging system-level security decisions.
The post Curious case of PXC node that refused to start due to SSL appeared first on Percona. | |||||||||||||||||||||||||
| LJ.Rossia.org makes no claim to the content supplied through this journal account. Articles are retrieved via a public feed supplied by the site for this purpose. | ||||||||||||||||||||||||||
| 5:00 am | Building Query Analysis and Insights Dashboard in PMM Percona Monitoring and Management is a great open source database monitoring, observability, and management tool. Query analytics is one of the prominent features DBA uses actively to trace the incidents and query performance identification. We all know and love the Query Analytics (QAN) dashboard… It’s the first place we look when an incident alert fires or when a developer asks, “Why is the app slow?” or “What was going on during the midnight production outage?” But sometimes, the standard dashboards just don’t tell the whole story or maybe are not clear enough. QAN is great, but shouldn’t we have more? If you have PMM running, you already have a Ferrari engine under the hood: ClickHouse. Most of us just drive it in first gear using the default UI. In this post, we are going to take the training wheels off. We will bypass the standard QAN interface and talk directly to the ClickHouse backend to build highly specialised dashboards. We aren’t just looking for “slow” queries anymore; we are hunting for inefficiency, volatility, and the “silent killers” that standard monitoring often misses. This is the hands-on blog, so grab your coffee and let’s turn that PMM instance into a deep-dive forensic tool. Create a New Dashboard in PMM
Now, by default this dashboard is plotting top 10 queries. If you have a query fingerprint handy, you may be able to filter the search by that specific query. That said, this is still plotting queries across all the monitored instances. Let’s move on to add the service_name filter.
Adding service_name filter
SELECT
  period_start AS time,
  left(fingerprint, 80) AS query_text,
  sum(m_query_time_sum/m_query_time_cnt) AS query_time
FROM
  pmm.metrics
WHERE
  (service_name = '' OR service_name = '$service_name')
  AND service_type = 'mysql'
  AND $__timeFilter(period_start)
  AND fingerprint IN (
    SELECT fingerprint
    FROM pmm.metrics
    WHERE service_type = 'mysql'
      AND $__timeFilter(period_start)
      AND (service_name = '' OR service_name = '$service_name')
    GROUP BY fingerprint
    ORDER BY sum(m_query_time_sum) DESC
    LIMIT 10
  )
GROUP BY
  time,
  left(fingerprint, 80)
ORDER BY
  time,
  query_time DESC
I know many of you are naturally curious and enjoy experimenting with PMM and Grafana… So you’ve probably already started thinking about how far this can be taken. Feel free to share your ideas or custom dashboards in the comments. Sample Dashboards:
The Query Analysis and Insights DashboardOkay, for those who are looking to have quick results, I’ve prepared the complete Query Analysis and Insights Dashboard for you to import and use instantly. By importing the JSON file, you’ll get the full working dashboard with all panels preconfigured, including:
This allows you to instantly explore PMM Query Analytics data, adjust time ranges and filters, and correlate query performance, contention, and workload behavior without recreating the dashboard from scratch. Dashboard JSON available here:
Give it a go and let me know if you have suggestions or requests. Also consider sharing if you create something interesting. Cheers. The post Building Query Analysis and Insights Dashboard in PMM appeared first on Percona. | |||||||||||||||||||||||||
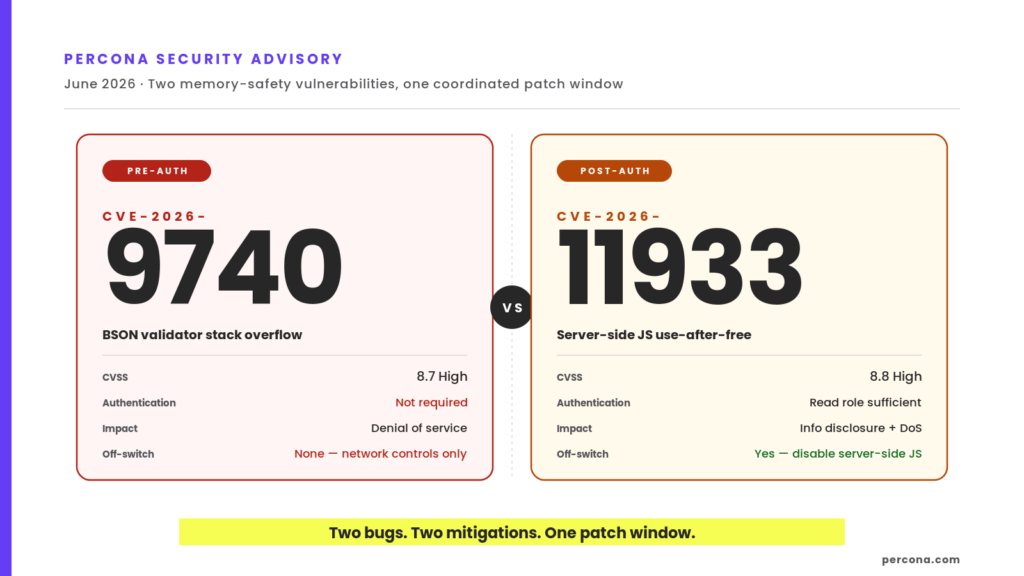
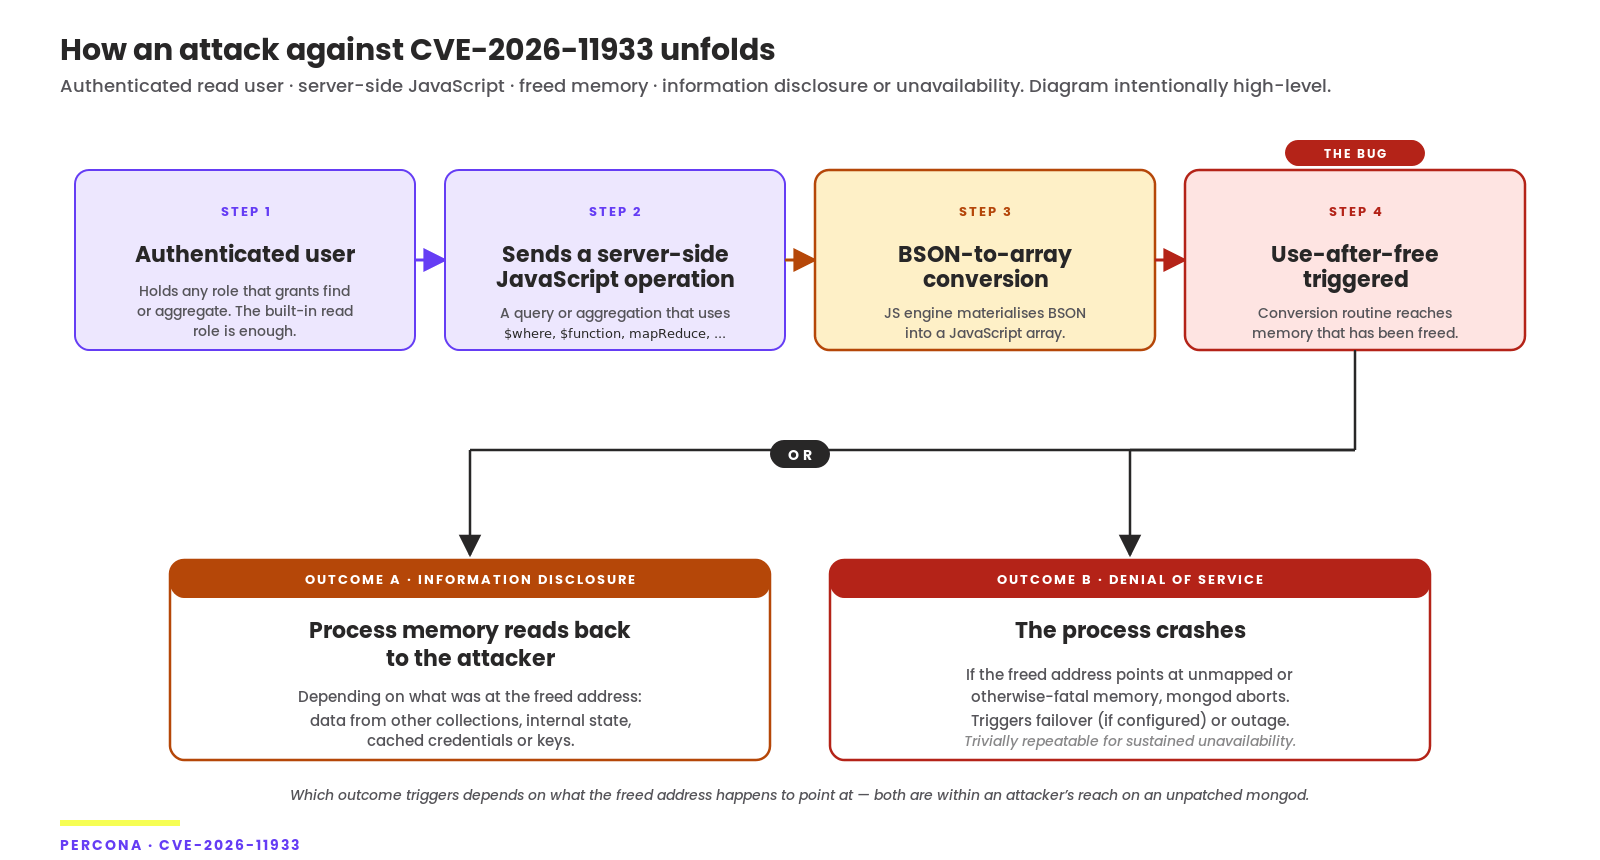

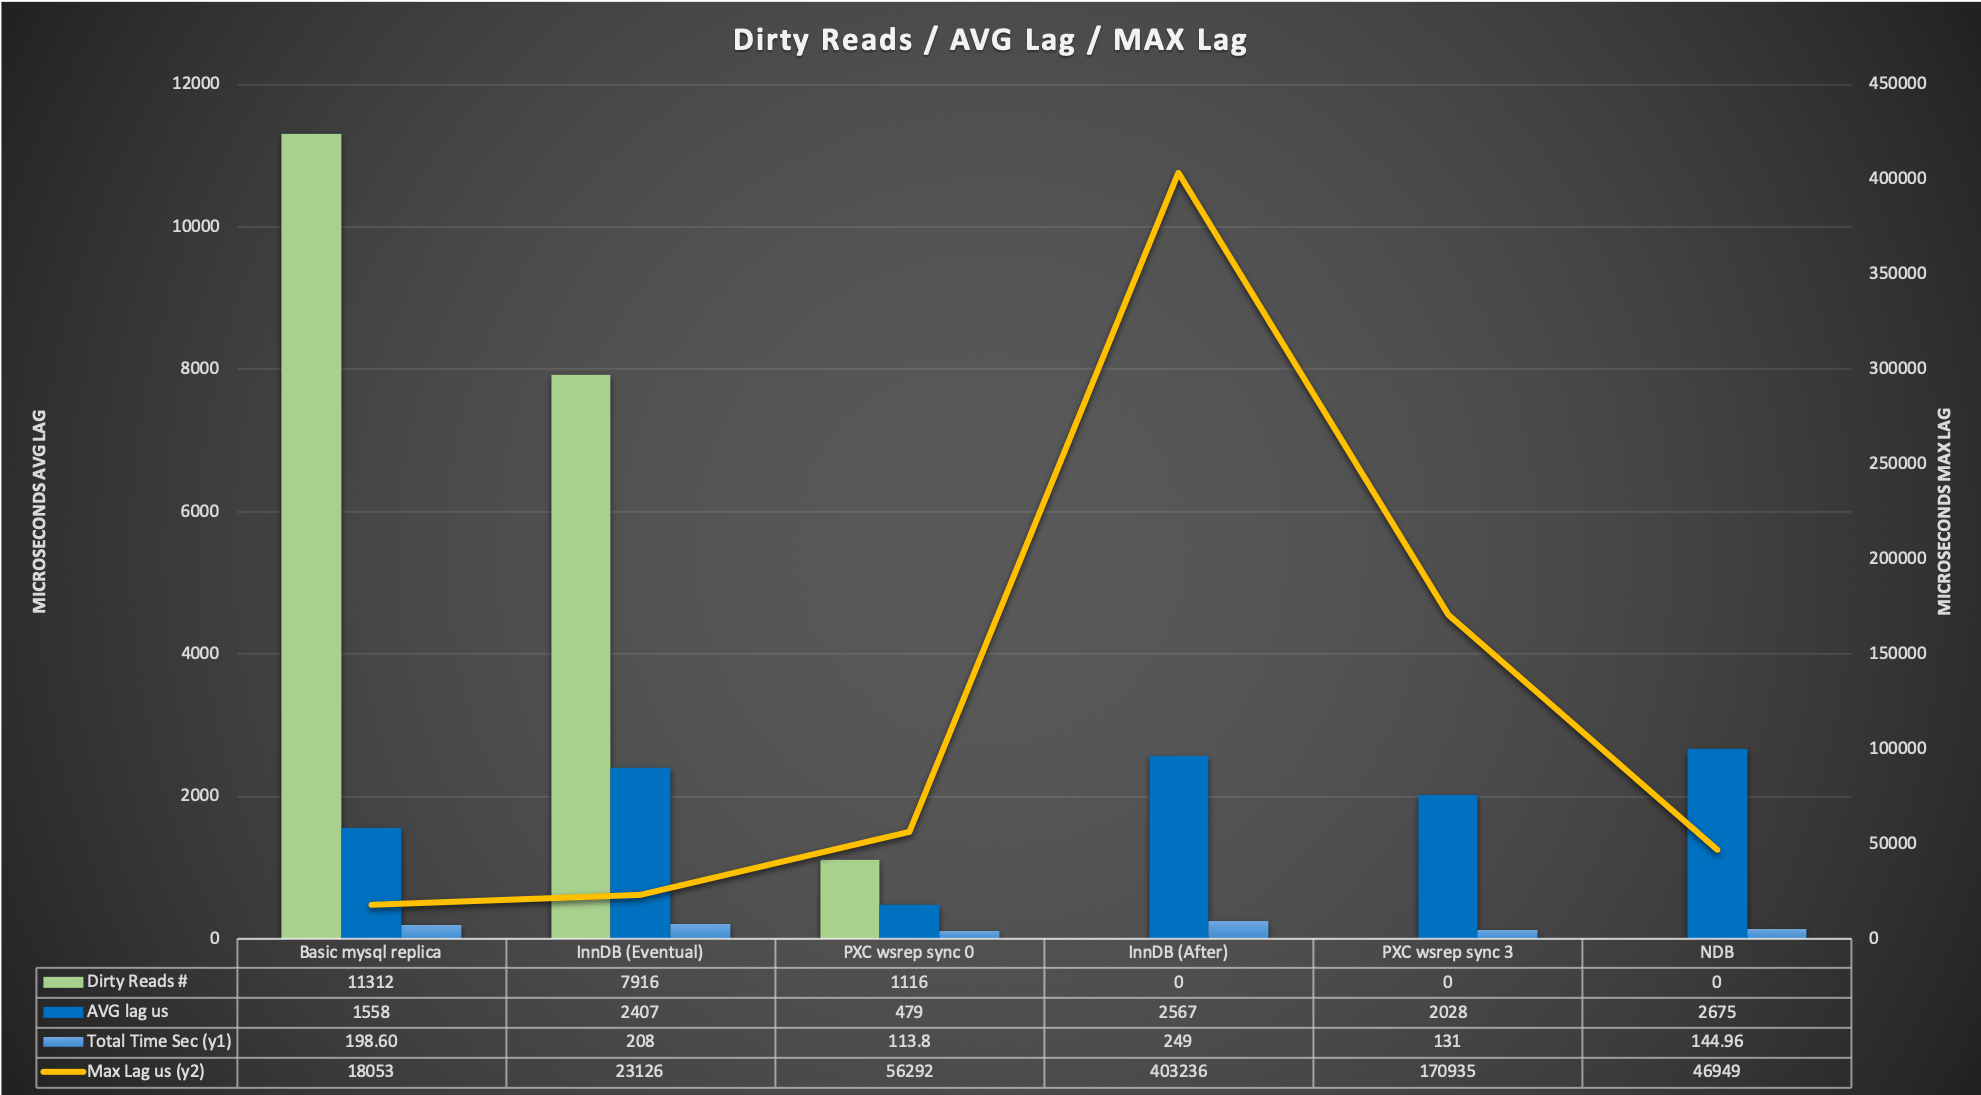
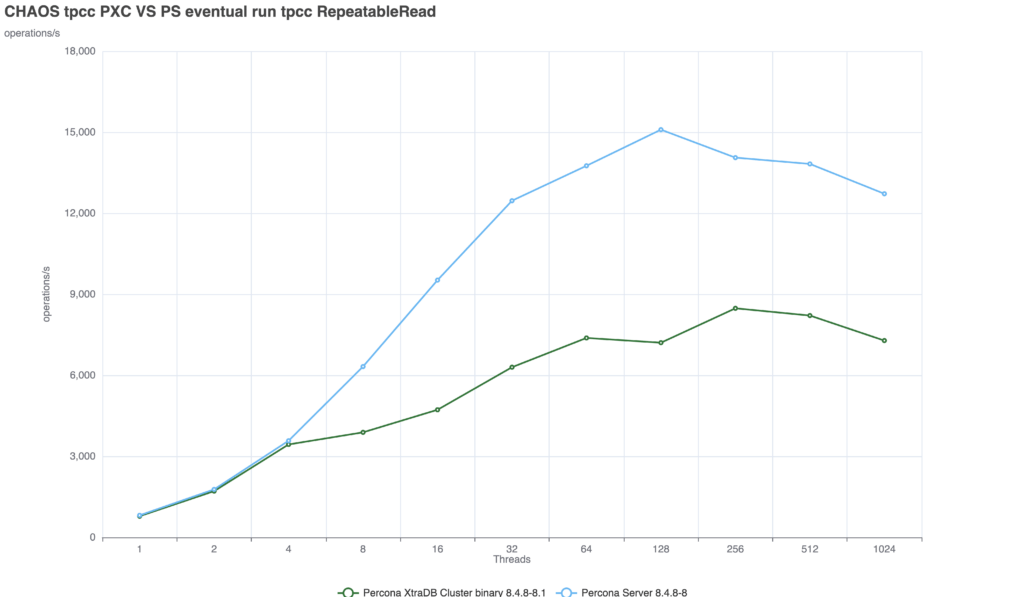
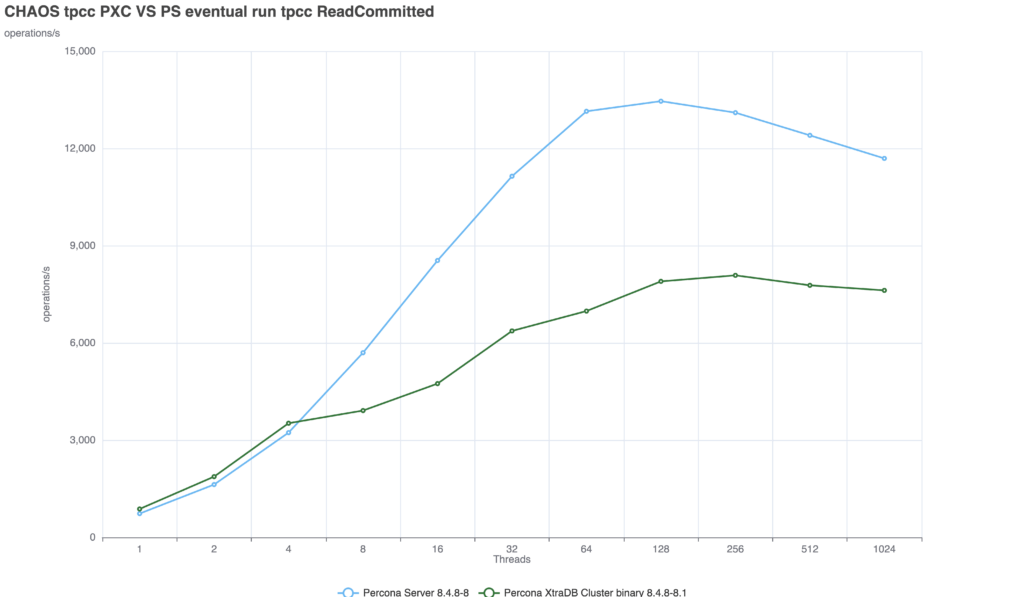
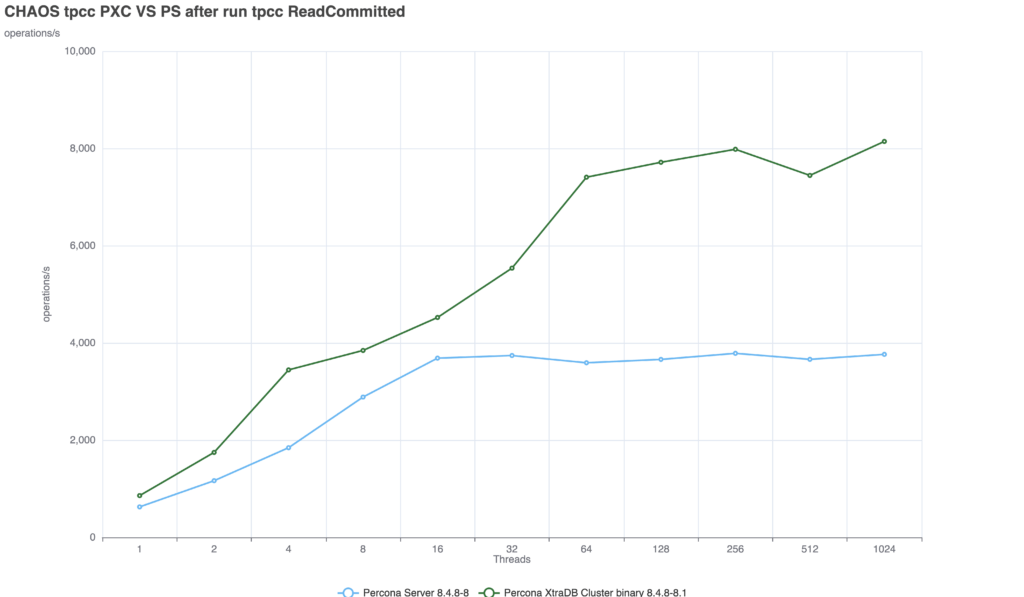
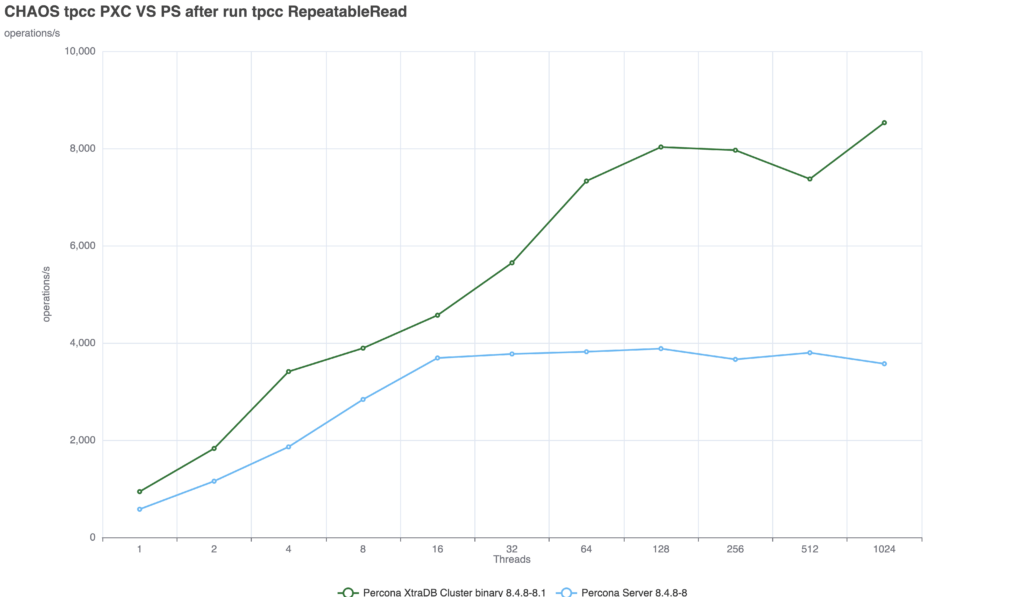
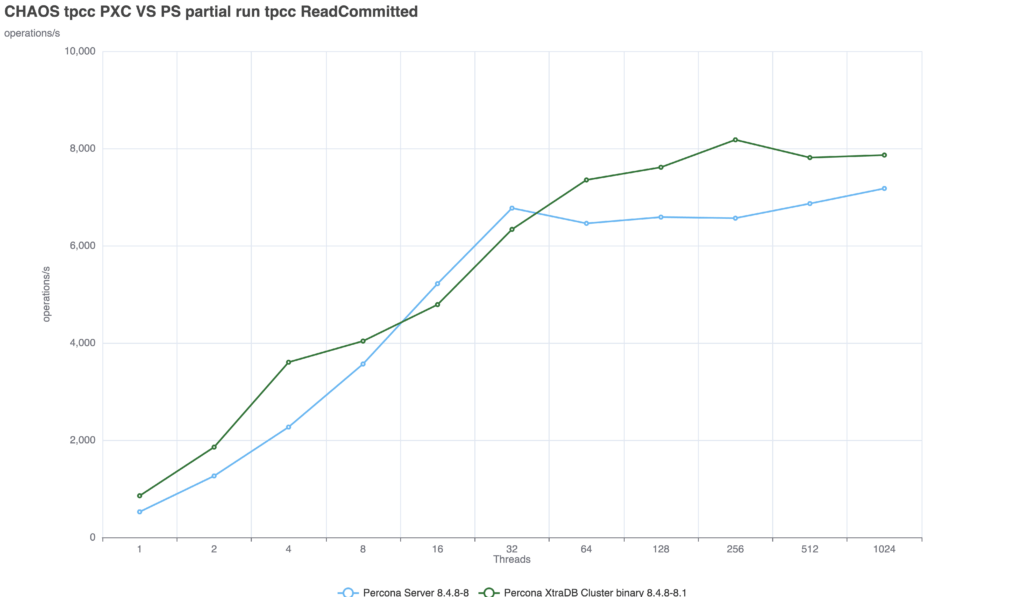
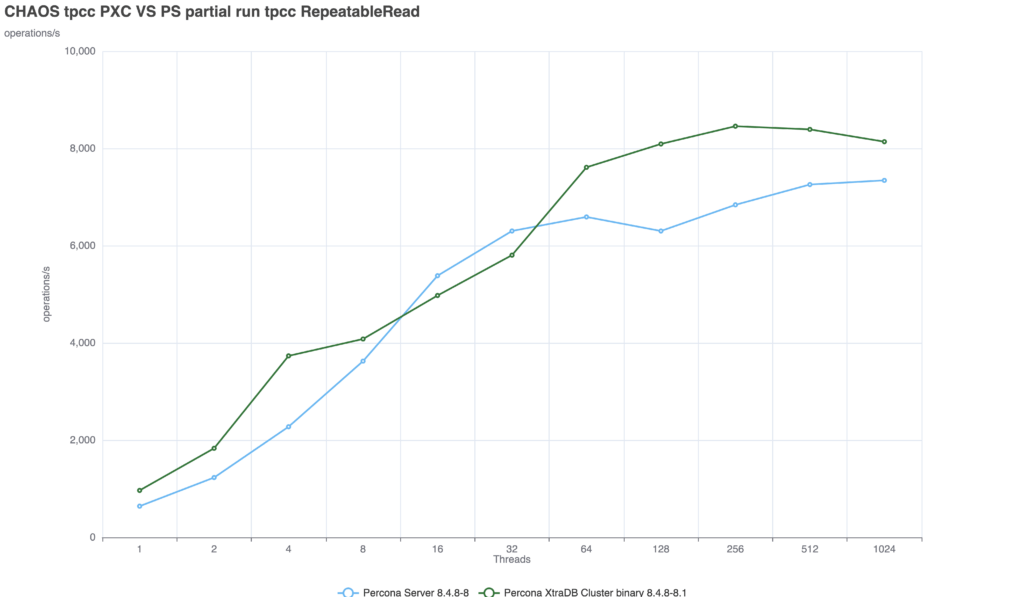
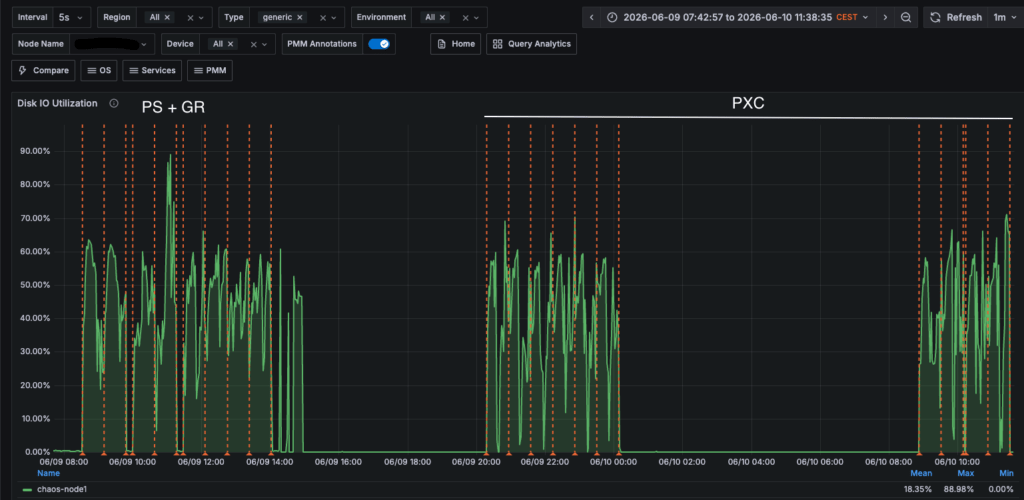
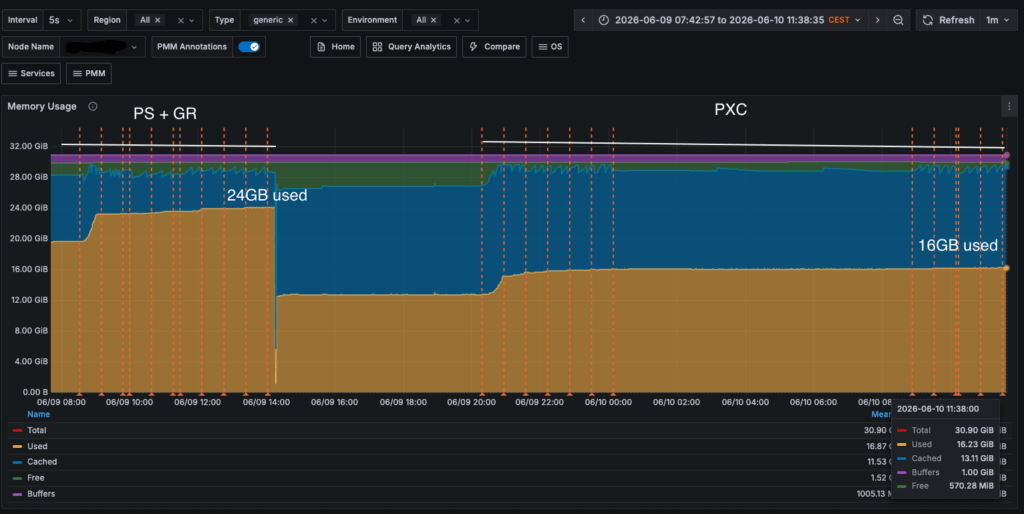
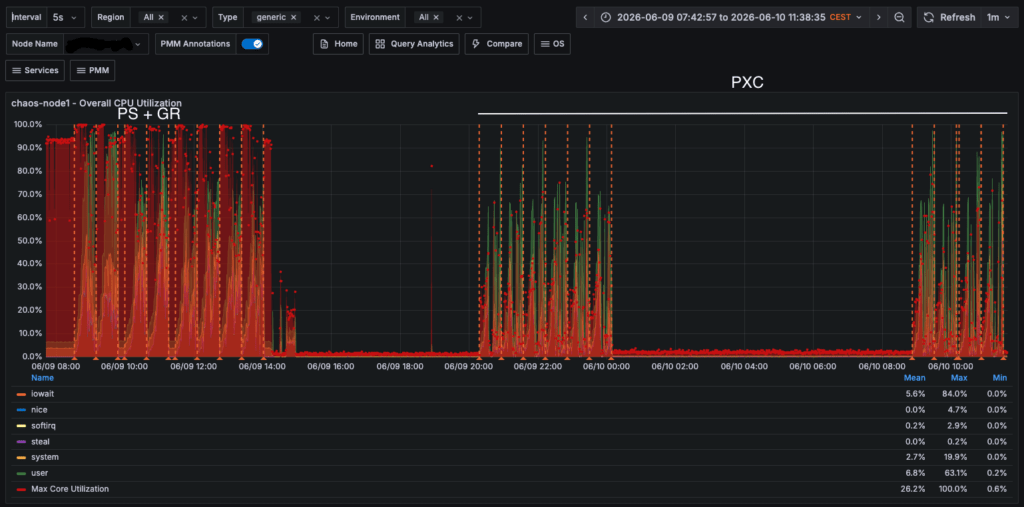
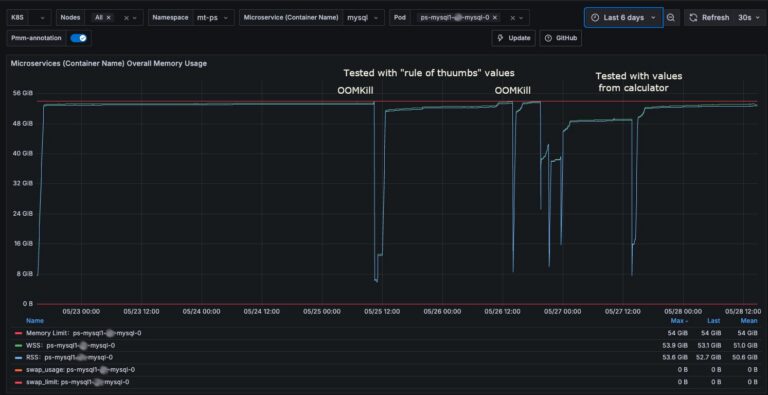

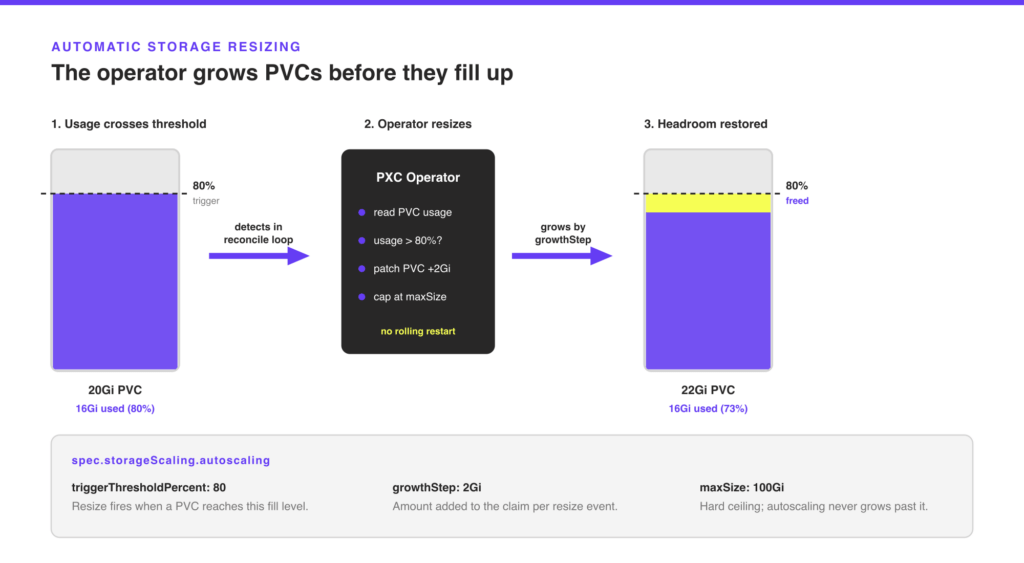

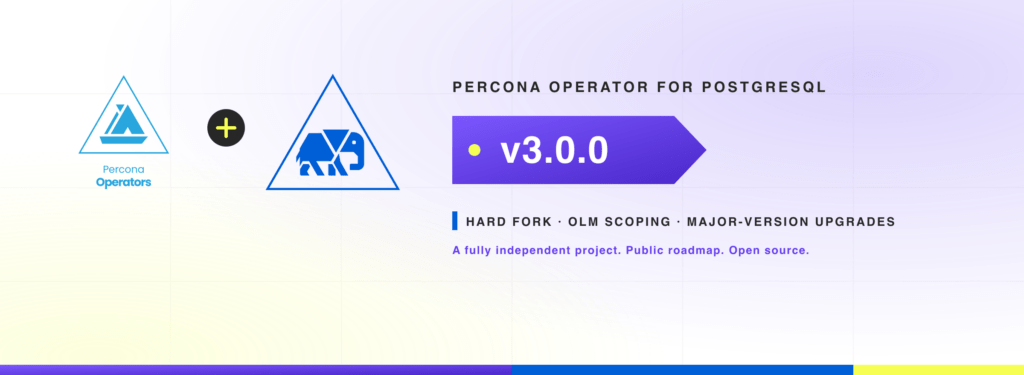
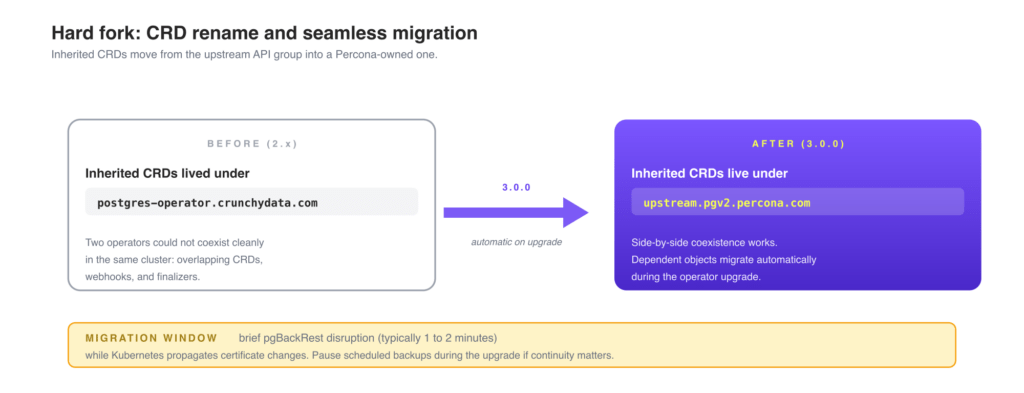
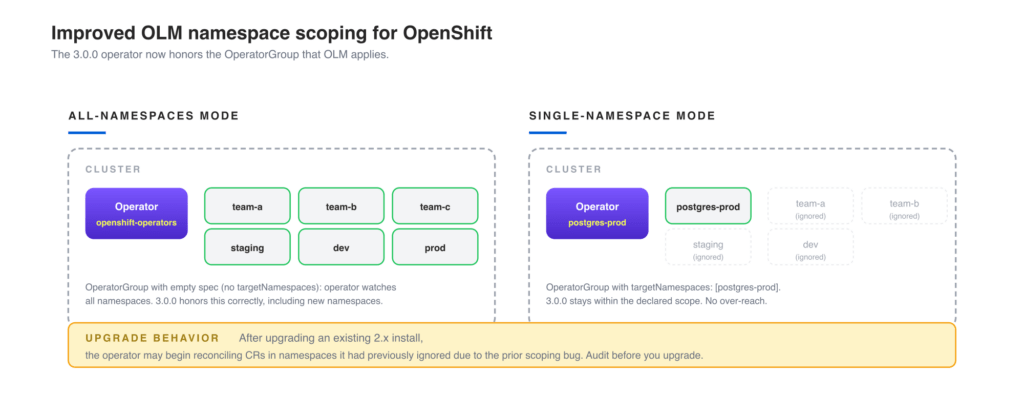
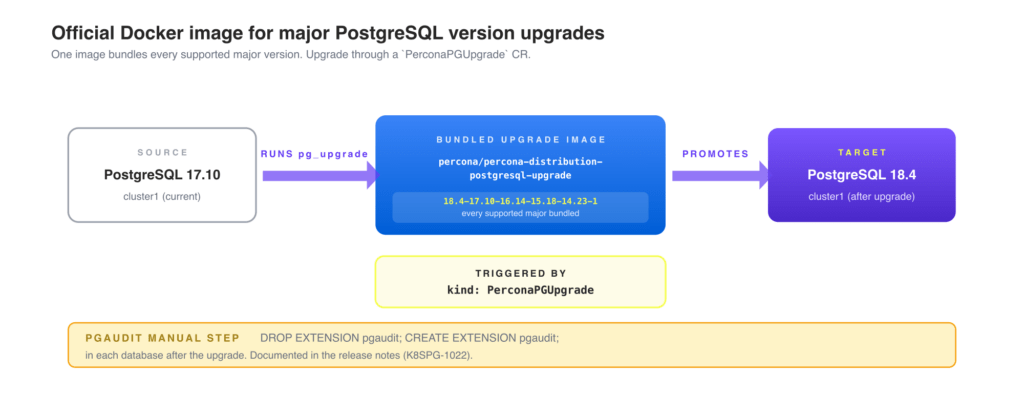


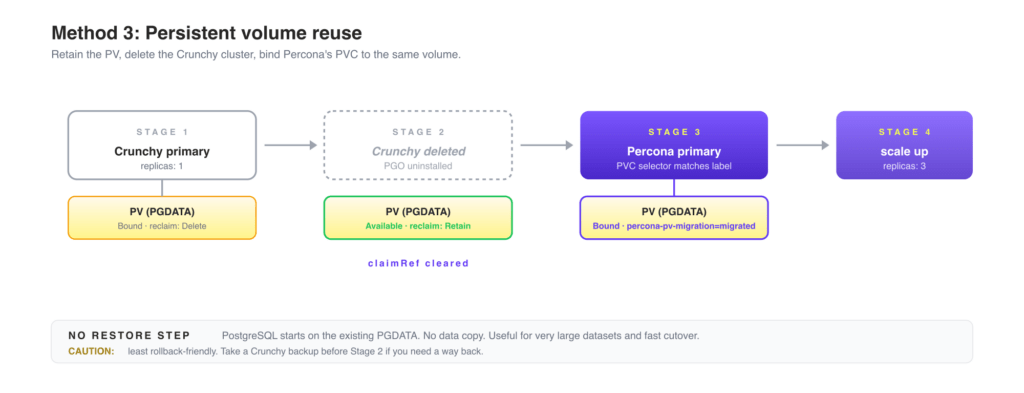
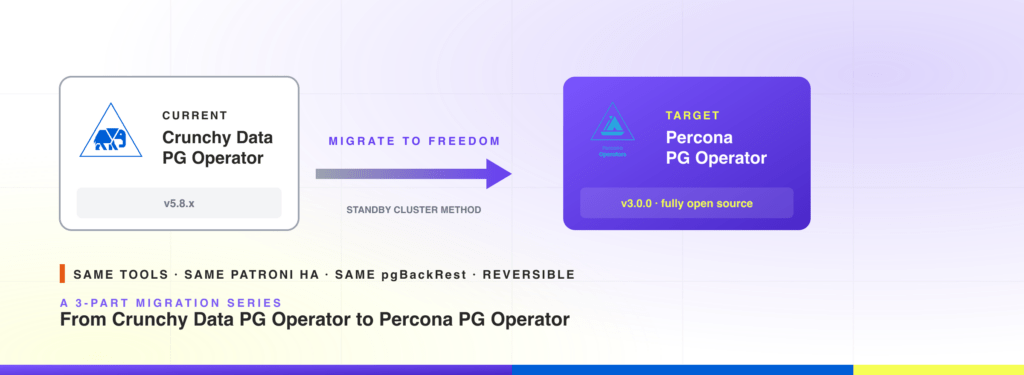
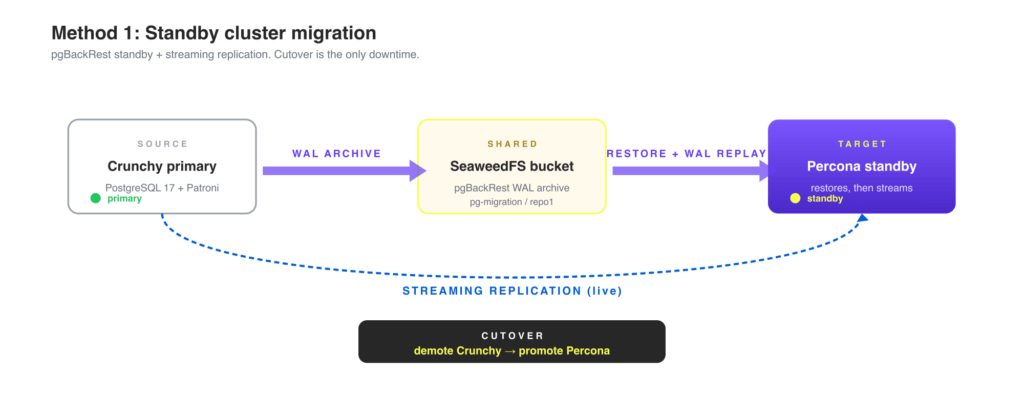

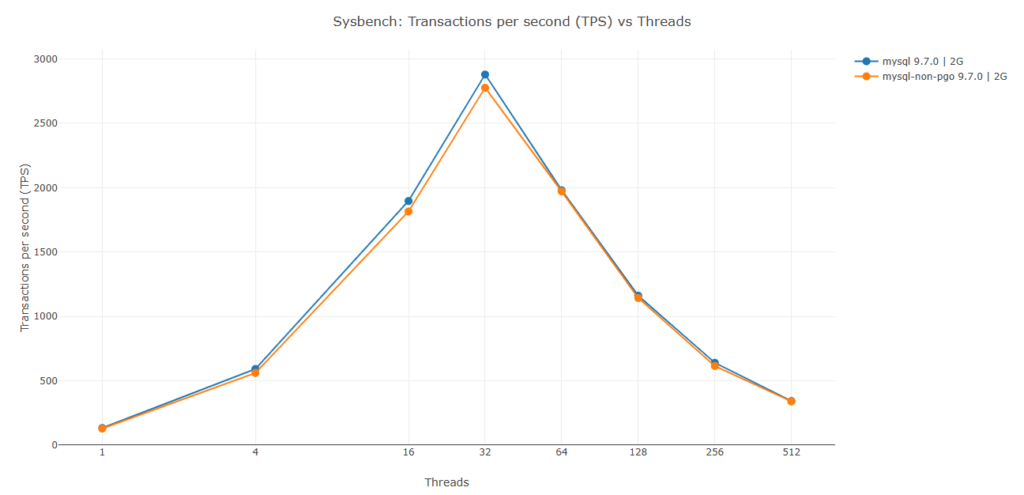
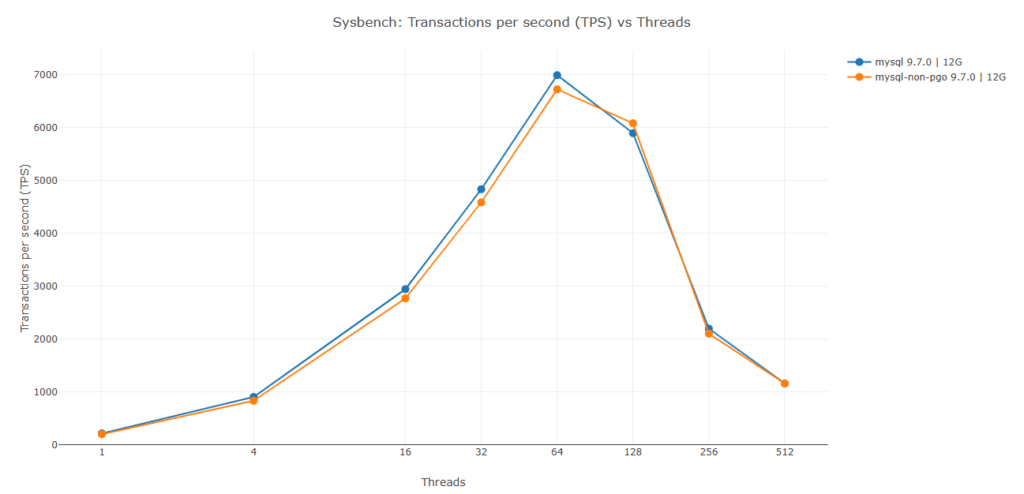
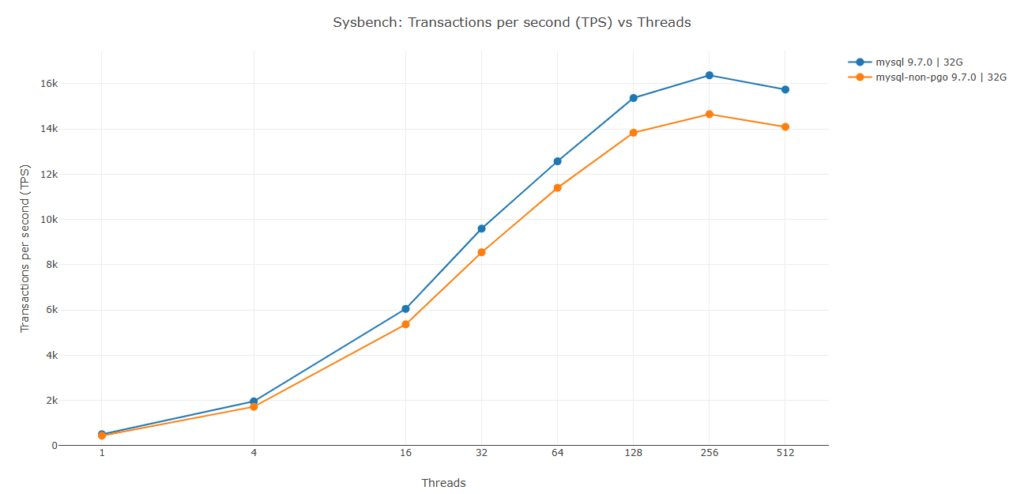
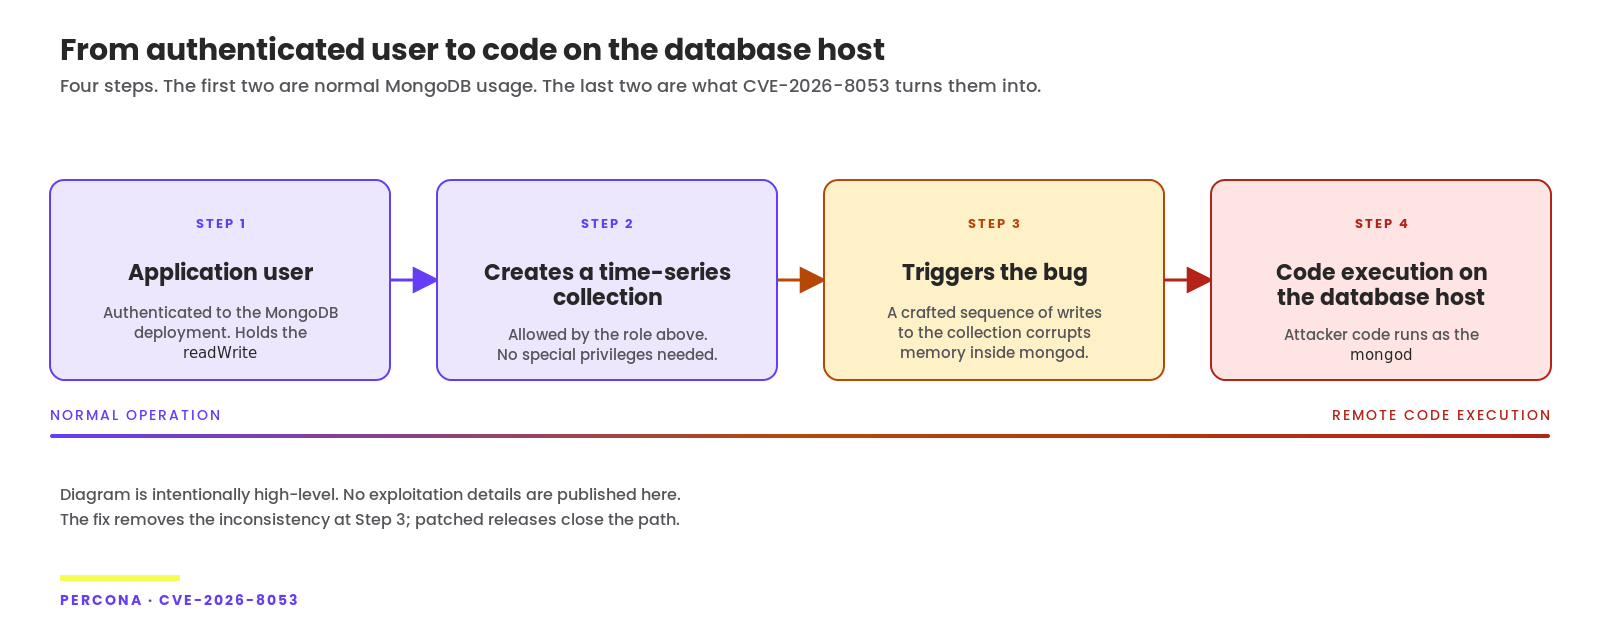
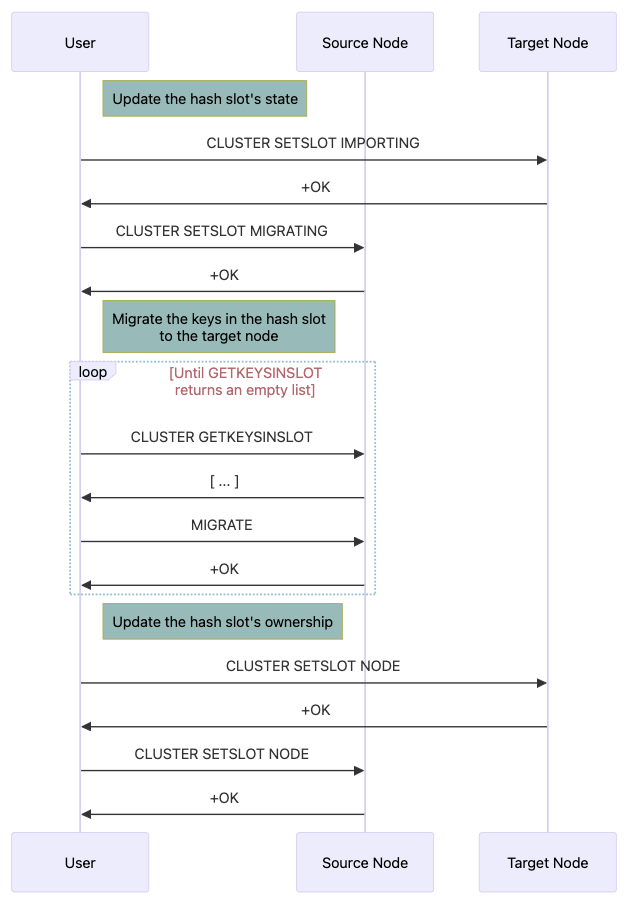
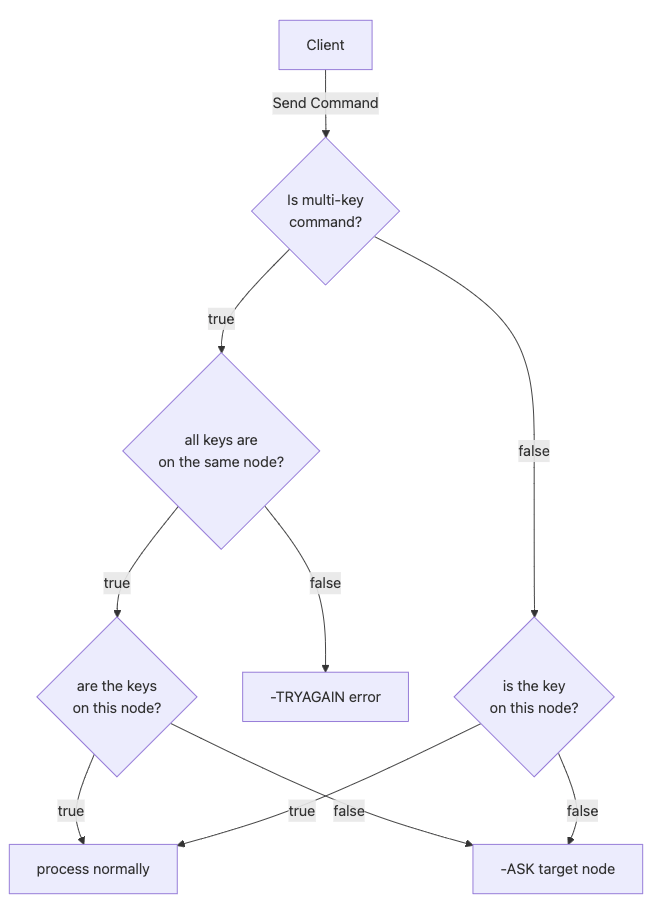
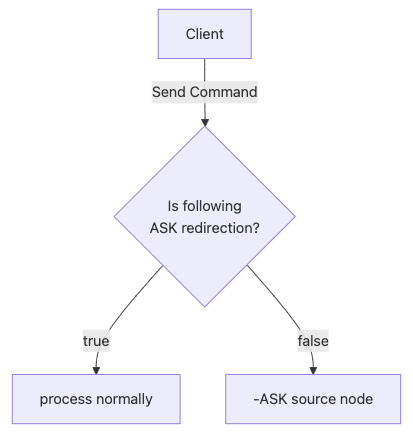
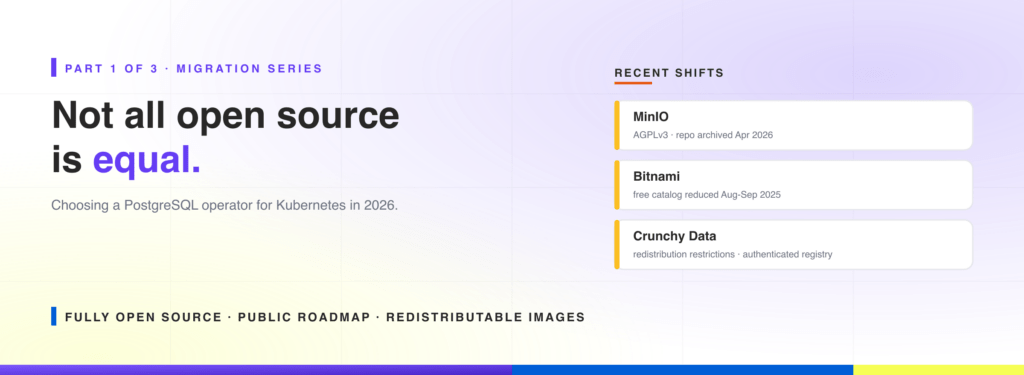


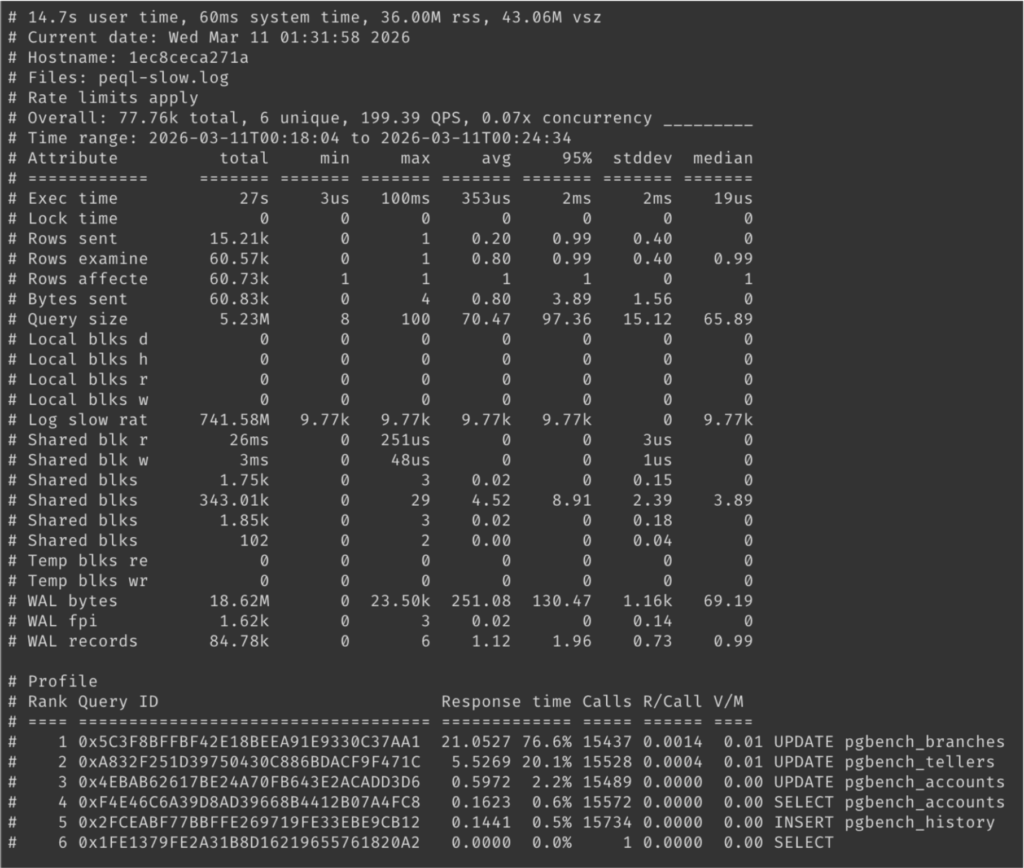
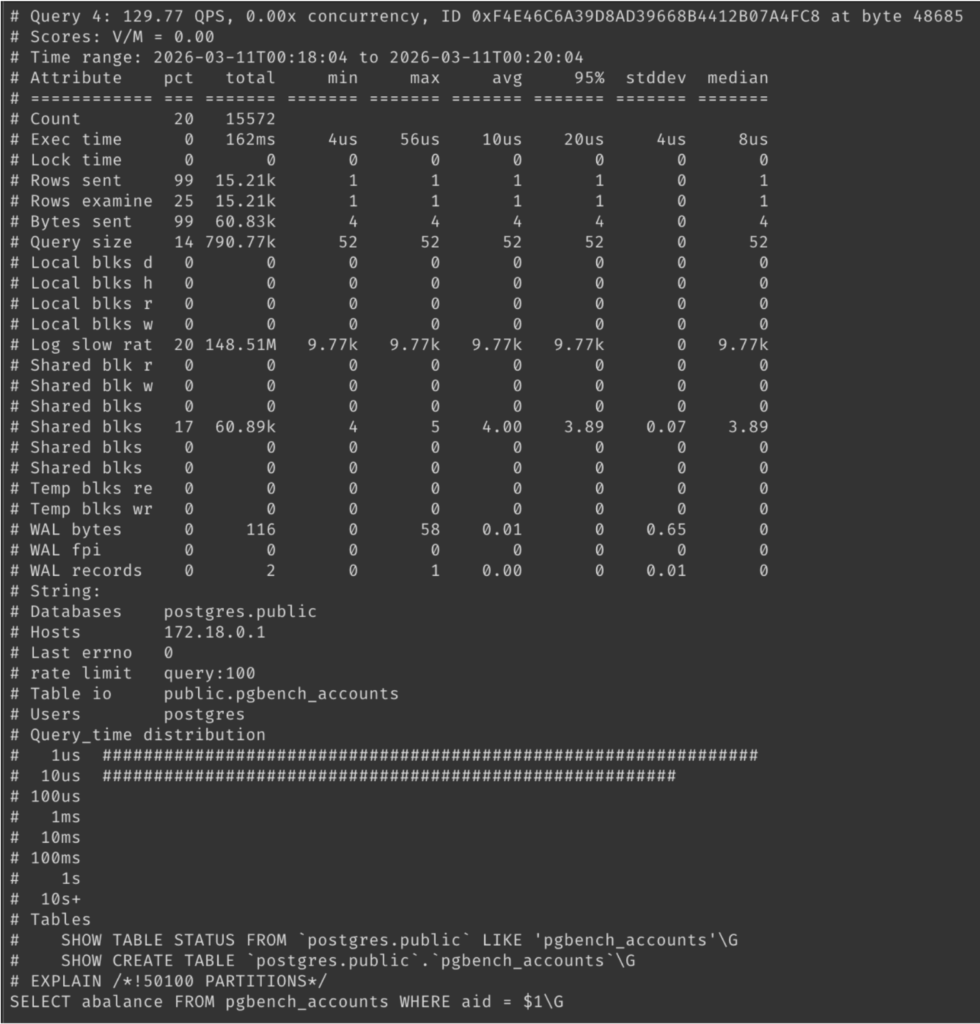
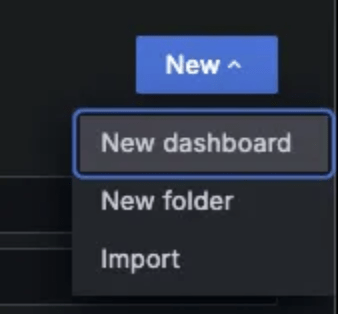
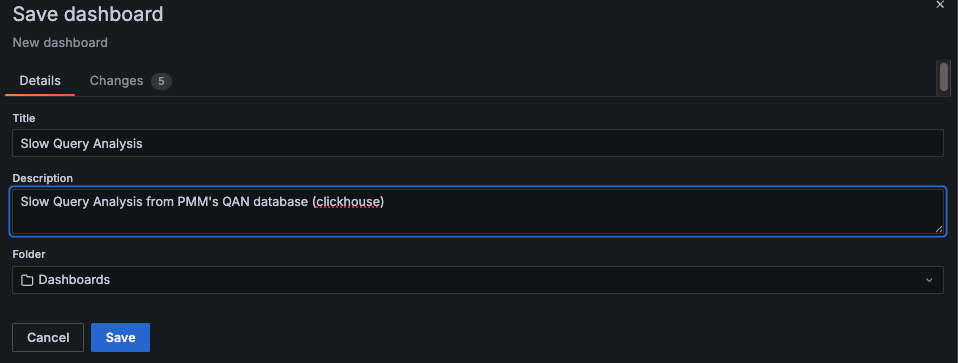
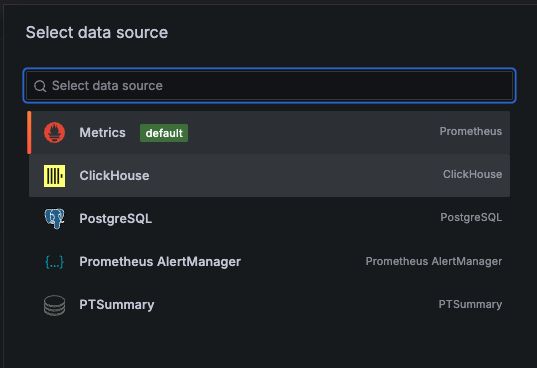
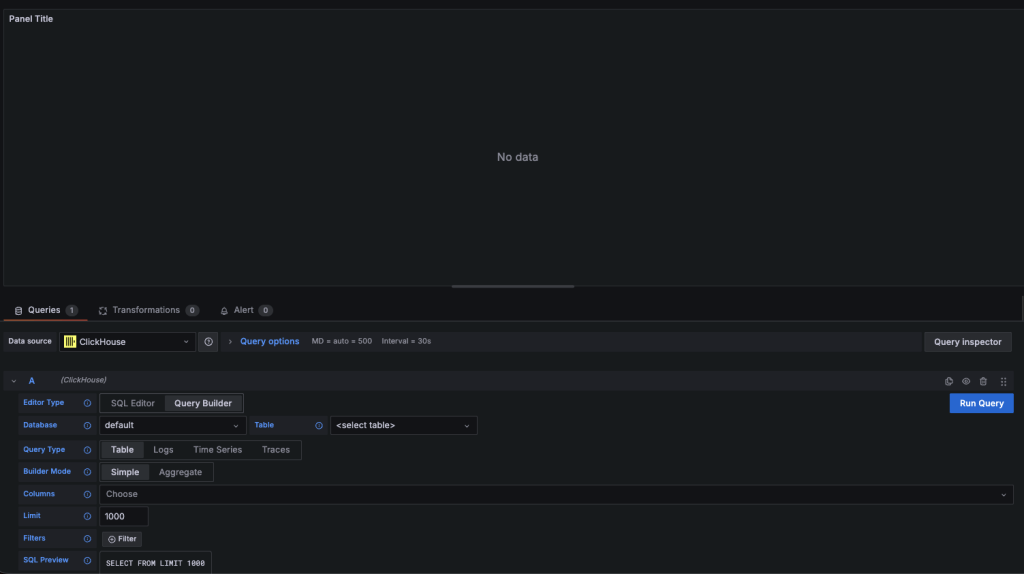
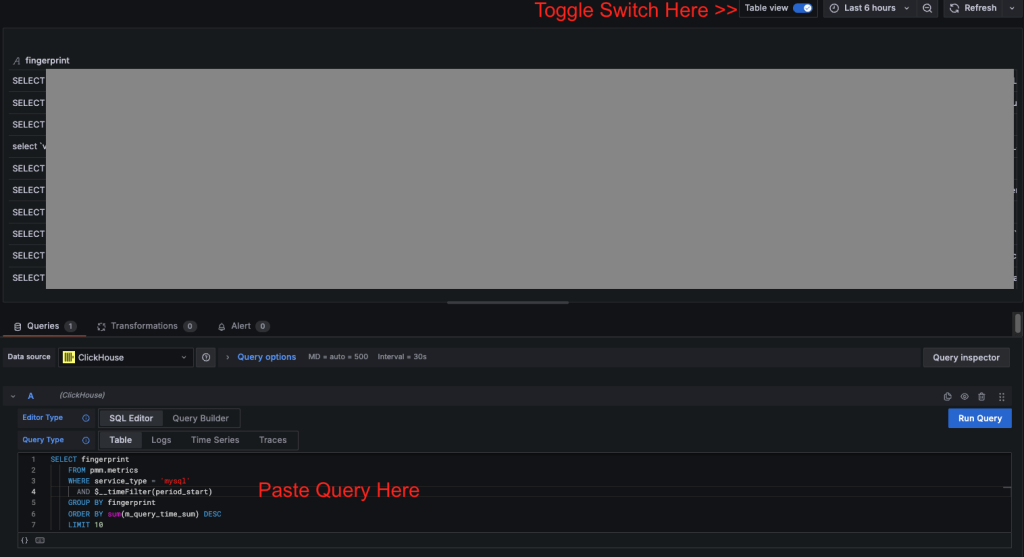
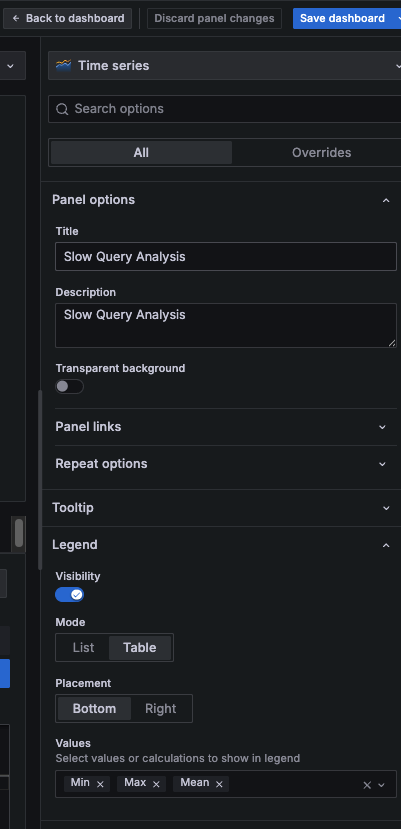
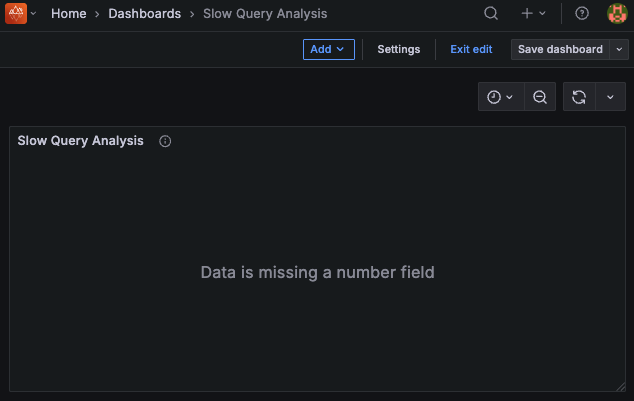 8.1 Choose “Variables” tab and click on “Add Variable”
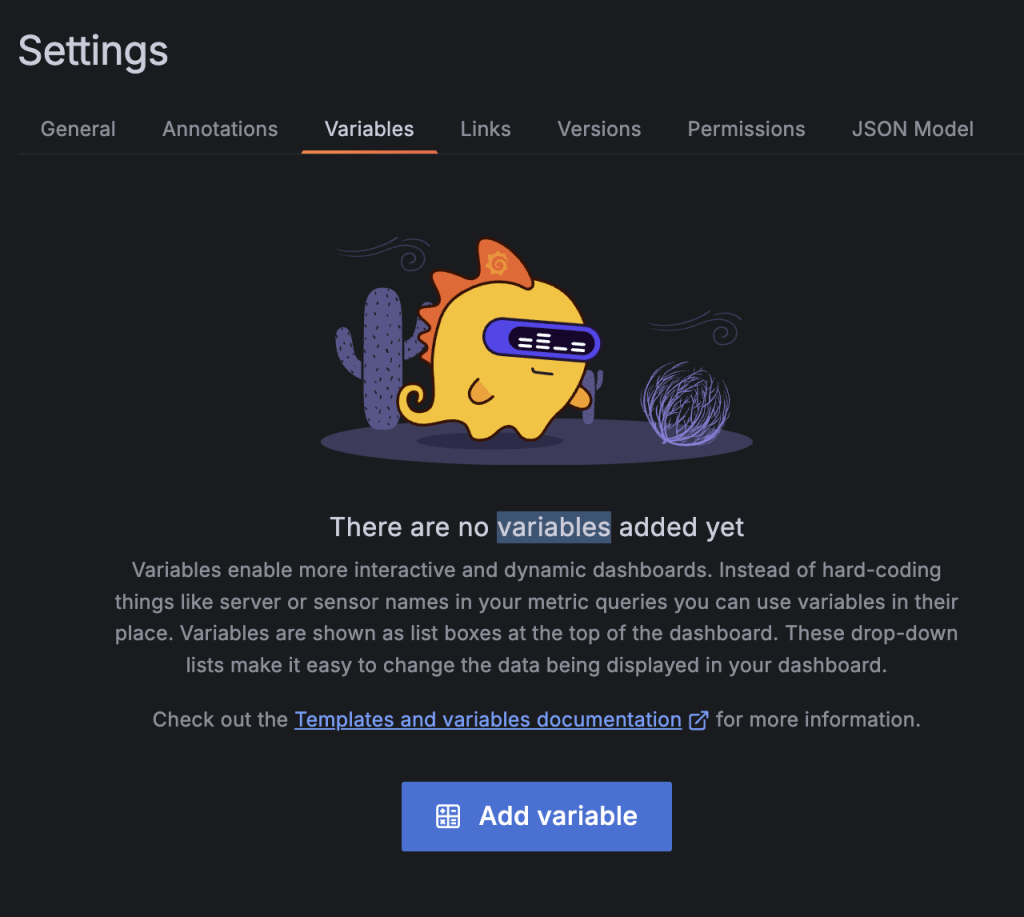 8.2 Add variable configuration and Save Dashboard
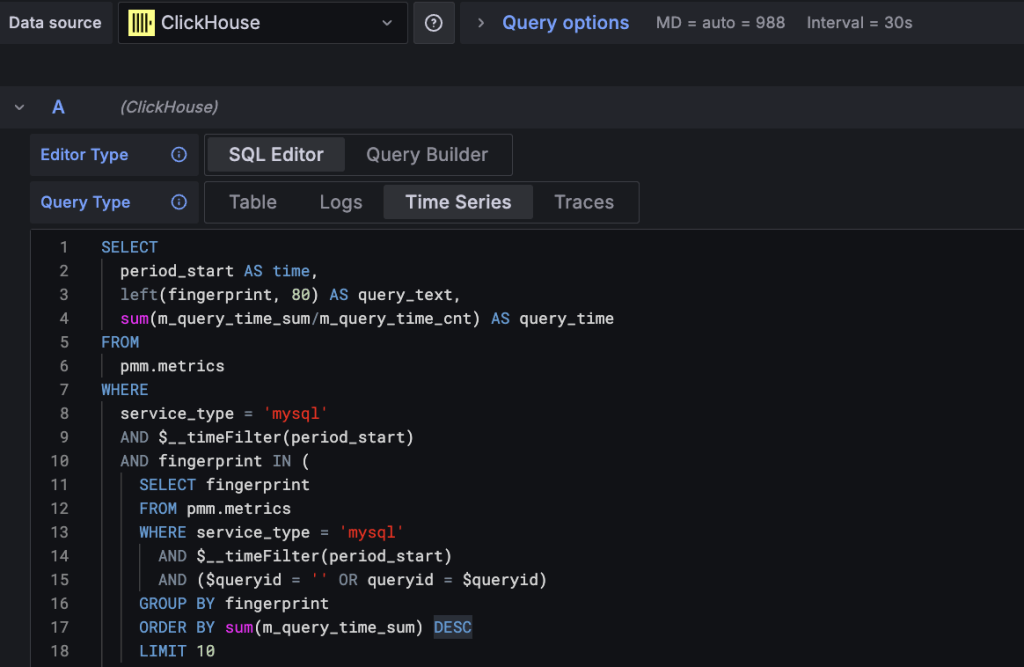
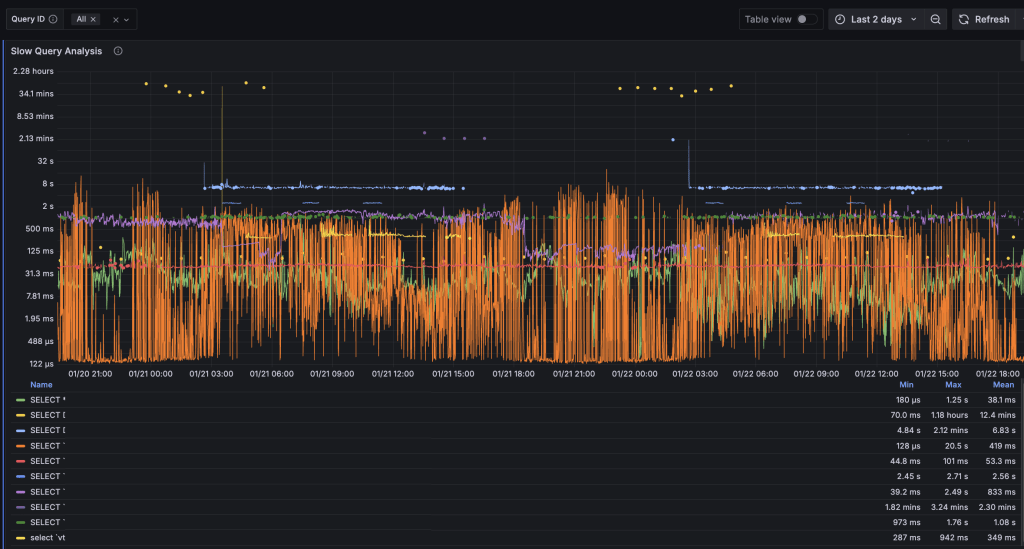
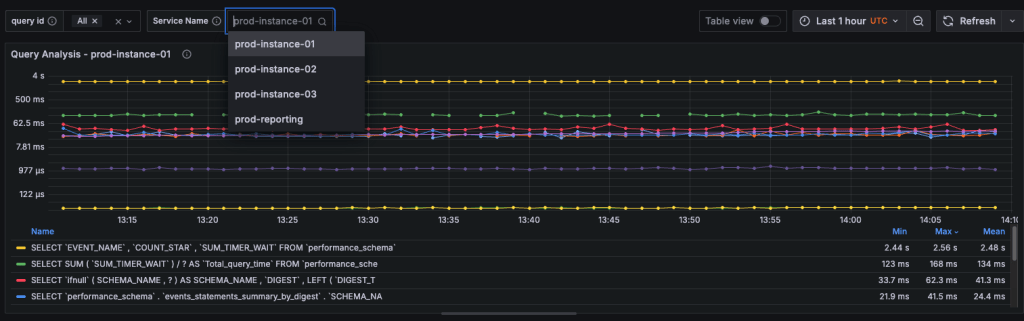

LJ.Rossia.org makes no claim to the content supplied through this journal account. Articles are retrieved via a public feed supplied by the site for this purpose.